Behind the Code: About the NES’ Sprite Capabilities

Displaced GamersBehind the Code series doesn’t get new videos often, but they’re always great. This one is more technical than usual, but I don’t think it’s really all that technical. It’s about how the NES processes and renders its sprites, particularly explains why there’s a eight sprite per scanline limit, and even reveals a couple of games that use that limit to produce special effects!

The gist: while each scanline is being prepared for display, the NES’ PPU looks through the entries for the machine’s 64 hardware sprites in order, finds the first eight that will display on the current line, and copies their attribute data to a small area of internal RAM. There is only space there for eight sprites, so, the NES cannot display more than eight sprites in a single scan line. Any later sprites in the primary attribute data won’t have room to be copied, and so the PPU won’t be able to display them.

One thing it notably doesn’t cover, however, is how games implement priority shuffling to cause sprites to flicker instead of not display at all. The video suggests that that might be coming in a future video….

NES Sprites, OAM, and the Battle for Priority – Behind the Code (Youtube, 19 minutes)

Fabian Sanglard on Sprite Creation on the Capcom CPS-1

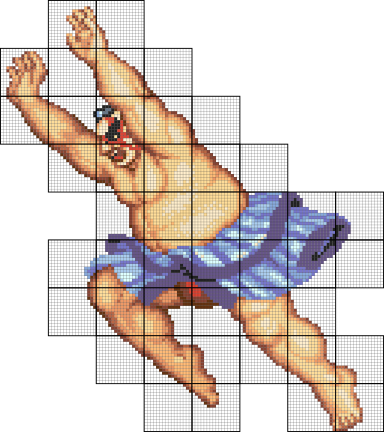
Street Fighter II has some really complex spritework! Its characters don’t actually use traditional sprites, but more what amounts to custom tile layers for each one. This helped unlock characters from being mostly rectangular, and allow them to have poses with radically different shapes.

Fabian Sanglard has a great article about how character art was created for that system that’s well worth your time to have a look at. Well, maybe it’s worth it? I don’t know you. For all I know you’re looking for sewing advice. This is probably the wrong site for that. No offense to all you clothes-makers out there.

ROMs were expensive, and Street Fighter II required a lot of them, so it was important to make the most out of each one. A big rectangular shape around Edmond Honda would contain a lot of empty, wasted space. Imagine how much space they would have wasted with Dhalsim’s long stretchy legs! With this system, they only had to include the graphics data that would actually contain pixels.

This was in 1991, mind you. More recent development practices would probably have the data be compressed in storage, which would take care of all those empty pixels, or at least they could make a tool to handle figuring out which tiles should contain data. What the Street Fighter II artists had to do was create physical representations of each character on a physical board, chop that up into squares, and figure out what each tile had to contain, a laborious process.

Fabian reckons this system was used for other CPS-1 games, going back to at least Forgotten Worlds. Looking at the tile layouts of CPS-2 titles, it seems a lot more evident that they used a packing tool to handle fitting their characters into the memory space. For more info, please go check out the article!

Pixel Art Manipulation Tools

Tiled is a popular open-source tool for tilemap construction

Popular and prolific game asset creator Kenney has a page up at Github that links to some of his favorite tools for manipulating pixel art, such as creating sprite sheets and extracting images out of them. It’s got a lot of useful info! If you have an interest in this style of art, especially making games with it, these programs are worth having in your toolbox.

Kenney: Manipulating pre-made game assets