Sharopolis Looks Into NES Technical Feats

Youtuber Sharopolis has a 20-minute video up examining several specific NES games and how some unexpected tricks were pulled off in each: Rescue: The Embassy Mission, Crash and the Boys Street Challenge, Castlevania III and Jurassic Park. I love learning about how developers overcame hardware limitations, and if you’re reading this, I’d wager there’s a good chance you do too!

How Speedrunners Get N64 Control Sticks

The Nintendo 64 broke ground for Nintendo in many ways, but arguably the worst part of that was the controller.

I’m not one of the people who complains about not understanding the controller or how to hold it. That part’s pretty easy to understand: you hold it one way, with the central prong in your left hand and the right handle in your right, for games that use the control stick like Super Mario 64; you hold it with one handle in each hand for games that instead use the Control Pad. It makes sense that Nintendo still wanted to feature the Pad prominently since it was one of the defining characteristics of the NES and SNES era.

The Control Pad is durable and easy to use, even if it does result in bruised thumbs when pressed with force, as can happen in challenging games. What’s not so durable is the N64’s signature control device: the Analog Stick. A special design that didn’t see much update after the Nintendo 64, because of the “white dust of death,” a mysterious fine powder that emerges from the inner workings of the stick after heavy use. Along with the powder always came degraded control performance: the stick would lose some of its tight feel, wobbling when shaken, and would no longer recognize the full extend of its range. All official N64 control sticks would succumb to the dreaded dust with time.

During the console’s life the source of the powder wasn’t common knowledge. It turns out it’s the result of the control stick grinding against its housing and actually rubbing itself in a fine dust. The looseness came from the powder getting into the tight confines of the stick’s mechanism, and from the pivot chamber getting looser as it was ground away by the joystick.

Some games were notorious for decreasing a controller’s working life. The Mario Party series was infamous for demanding rapid spins of the control stick, that could produce the dreaded dust and wobble after surprisingly few games. But with use, it seemed that all the official joysticks would succumb to it eventually. Third-party sticks, such as the then-ubiquitious MadCatz sticks, didn’t suffer from the problem, but their control sticks weren’t as sensitive, and required a smidge more force to push. For demanding play, the official sticks are a must.

This has resulted in a big problem. Since all the Nintendo-made N64 sticks degrade eventually with use, and Nintendo isn’t making them any more, speedrunners playing on original hardware have few options for playing games the way they were intended by their designers. Some jealously hoard pristine sticks, which have become expensive, while others work to make replacements.

Retromeister on Youtube has made a 24-minute video explaining the problem, and the lengths to which runners have resorted to keep themselves playing. And this, following, is that very thing:

A Guided Tour of the NES

This tab has been open on my browser for literally months, so I’m finally excising it from the bar….

A while back the site HackADay did a teardown of the NES, going through how to take it apart and reassemble it, and going through some of the elements of its assembly. It doesn’t go into a lot of detail, but that lets it be fairly short, at only nine minutes.

NES Hardware Explained (HackADay post, Youtube video)

The Lost Sound Code of Sinistar

Sinistar was a game that had quite an impressive sound design. It borrowed a bunch of its sound effects from earlier Williams games, with which it shared common hardware that was originally design for pinball machines. A cockpit version of Sinistar, of which only around 200 units were made, was the first arcade game to have stereo sound. And of course all versions of the game have the Sinistar’s famous digitized threats and taunts.

While Sinistar’s main program source code was found and made available on Github, the source of the code that drove its sound hardware has long been lost. Youtube user SynaMax has done the best he could at recreating that code, and has made a video talking about the process, the sound design of Sinistar and other early Williams games, and even found unused sounds in the code.

Contained within the code is the revelation that the sound chip that drove the rear speakers in the cockpit version ran slightly different code than contained within the main sound ROM. The data from that version of the game was only dumped this year, meaning that the game running in MAME was somewhat incorrect.

Now that the right version of the chip has been dumped, the cockpit version of Sinistar now sounds properly in MAME. Although this does mean that users running up-to-date MAME have to refresh their romset for this version of the game. Such are the tradeoffs of MAME emulation.

Another revelation of the video was that the parametric sound generators used by Williams arcade games from that time often produced interesting noises if it was fed with random data. Sound programmers sought out different sets of numbers to give them, including by asking passers-by for numbers off the top of their heads and garbage values found in RAM when dev systems were powered up, in order to produce strange sound effects.

Devs using more recent parametric generators like bfxr, LabChrip, ChipTone, sfxia, rFXGen, wafxr and jfxr can produce noises by similar means using those programs’ Mutate or Randomize buttons!

I feel like I should warn however, near the end of the video is mention of a bit of drama concerning the MAME developers, in getting code supporting the change integrated into the software. I’m not weighing in on this, not the least reason being I don’t know enough about it. But I feel like you should know it’s coming, ahead of time, before embarking on the 51-minute journey.

Rescuing the Lost Code and Stereo Sound to Sinistar (Youtube, 51 minutes)

The Copetti Site: Architectures of Recent Game Consoles

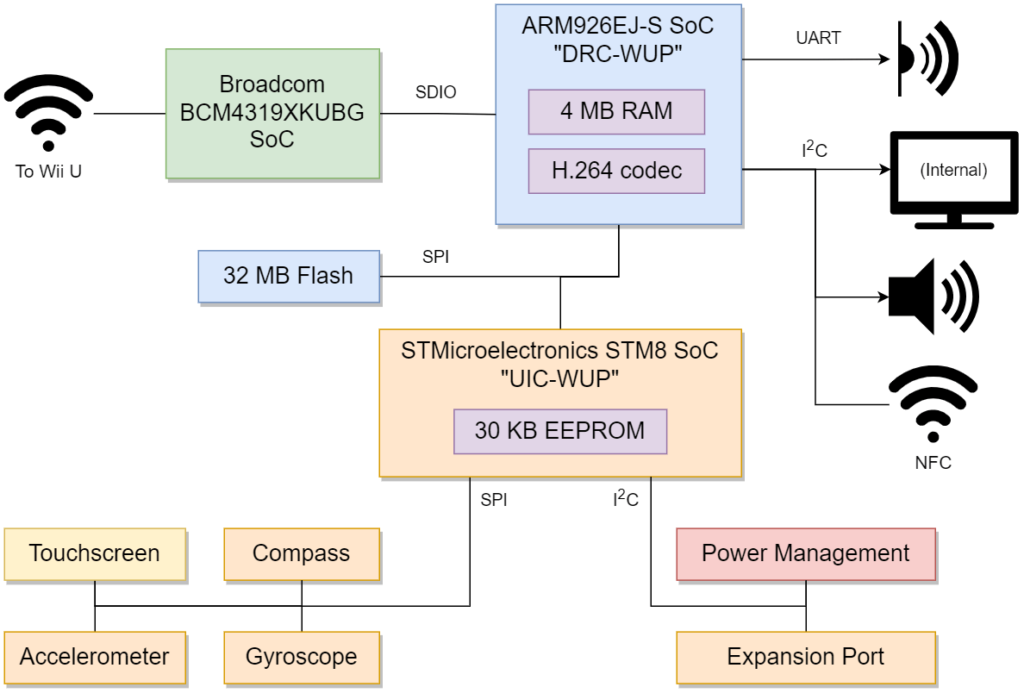
From the site, a diagram of the architecture of the Wii U’s Game Pad

A good old-fashioned website! It’s hope to information on the construction of a wide variety of console platforms! Docs on the NES, the Sega Master System, the PC Engine (a.k.a. Turbografx 16), the Mega Drive (a.k.a. Genesis), Gameboy, SNES, Saturn, Playstation, Virtual Boy (yes), Nintendo 64, Dreamcast, Playstation 2, GBA, Gamecube, Xbox, DS, PSP, Xbox 360, Playstation 3, Wii and Wii U.

The Copetti site: Architecture of Consoles

The Graphics of Trap Door and Popeye on the Commodore 64

In my teens I got started coding on my old Commodore 64s. Learning to program was a much different process back then, there was no internet to answer basically any question you’d have almost on a whim, everything I picked up came from some written matter, mostly programmer’s guides (including the definitive guide to using the hardware, the Programmer’s Reference Guide) or periodicals like Compute’s Gazette, Ahoy! and Commodore Magazine.

The C64 had a lot of graphics features, made possible by the machine’s powerful VIC-II chip. All of the home computers of the time had tricks one could use to get extra mileage out of their bespoke graphics hardware. The Atari 8-bit computers had display lists, for instance. The VIC-II had a powerful raster interrupt facility, the ability to share memory with the processor (at the cost of delaying the whole machine while it did so), eight surprisingly large hardware sprites (in double-width mode they could fill a whole scanline, something the NES’ sprites could only dream of doing), and a collection of interesting and flexible graphics modes.

Most of the time the C64 was in character mode, which was the standard kind of tile-based mode that pretty much all home computers at the time used by default, suitable for displaying messages, coding and some graphics. The ’64 three such modes: the standard mode where each character had a single color along with the screen-wide background color; a multicolor mode that gave a character its own color, up to two colors shared throughout the screen and that background color, and (mumble mumble). Sorry, what’d I say? I’ll get to that later.

The system also had two bitmapped modes that worked similarly, just directly viewing a region of memory instead of using each byte as an index into a character set. One mode was like the standard character mode, where the 1s in the bitmap were colored and the 0s were the background color; the other was multicolor mode, which similarly worked like it did in multicolor character mode: one color per 8×8 region, two colors shared throughout the screen, and the background color.

The problem with multicolor mode was, you had to trade horizontal resolution to use it. The big limiting factor to many computers’ graphics then was memory use: finding a way to encode the graphics information so the chip could access it and convert it into a video signal quickly enough to meet the needs of the display. So, to fit an 8-pixel-wide section of screen into the single byte it needed to be squeezed into, it could either use a one-to-one dot to screen ratio, or sacrifice two bits for one extra-wide pixel of up to four possible colors.

UNLESS

The Commodore 64 had a fifth graphics mode. The one I mumbled over earlier. The much-ignored Extended Background Color mode.

It was another character based mode that, instead of forcing you to make use of one background color over the whole screen, gave you up to four such colors. Every cell on the screen could display a character using its full 8×8 resolution, but could also pick which of those background colors it could have. Useful!

Well… not as useful as you’d think. There’s always a tradeoff, and Extended Background Color’s tradeoff was a dire one. How does the VIC-II chip know which background color to use for each character cell? It uses the two high-order bits of each character byte. Meaning, while you could decide which of two colors would be used in each cell with a lot greater nuance, you only had 64 characters to work with! A full screen of 1,000 characters is a lot to fill with just 64 possible tiles. A lot of repetition would be unavoidable, which is probably why it was so little-used.

It essentially was either this:

or this

These images are a little misleading, because I used the Commodore 64’s default ROM character set to make them, and the second half of its characters are just mirror images of the first half. But if you define your own characters, which basically any game worth its salt will do, it greatly reduces the number of tiles at your disposal. There may be some sneaky ways around it, sure, but they all involve their own tradeoffs.

I explain all this because Extended Background Color Mode is my best guess as to how Trap Door and Popeye do their graphics.

Here’s video of a playthrough of Popeye. It’s about 21 minutes, but it shouldn’t take long to get what I mean. It’s not Nintendo’s Popeye, it’s a completely different game.

And here’s a playthrough of Trap Door, with graphics by the same person:

Look at those huge characters! How could this be possible, and with that color depth? The C64 can have huge sprites, but only at the cost of making all their dots twice as tall and/or wide. And the pixels aren’t even multicolor mode wide. I can’t quite make sense out of it! Unless, maybe the games are displaying their large characters using the character set, which explains why they jerk along the screen? And the colors are using Extended Background Mode? That might explain the simplicity of the backgrounds, with only 64 characters to work with that means a lot of reused tiles.

I guess the point of this post is: what gives?

Behind the Code: About the NES’ Sprite Capabilities

Displaced GamersBehind the Code series doesn’t get new videos often, but they’re always great. This one is more technical than usual, but I don’t think it’s really all that technical. It’s about how the NES processes and renders its sprites, particularly explains why there’s a eight sprite per scanline limit, and even reveals a couple of games that use that limit to produce special effects!

The gist: while each scanline is being prepared for display, the NES’ PPU looks through the entries for the machine’s 64 hardware sprites in order, finds the first eight that will display on the current line, and copies their attribute data to a small area of internal RAM. There is only space there for eight sprites, so, the NES cannot display more than eight sprites in a single scan line. Any later sprites in the primary attribute data won’t have room to be copied, and so the PPU won’t be able to display them.

One thing it notably doesn’t cover, however, is how games implement priority shuffling to cause sprites to flicker instead of not display at all. The video suggests that that might be coming in a future video….

NES Sprites, OAM, and the Battle for Priority – Behind the Code (Youtube, 19 minutes)

Someone Runs Mac OS 9 on a Nintendo Wii

The narrator has a moderate case of Youtuberitis (symptoms evident: over-gesturing with hands, annoying shtick; absent: ending sentences in an undertone like they were John Cleese playing a TV presenter), but it’s still an interesting and even informative video about making software, and hardware, doing things they really weren’t designed to do.

One piece of the puzzle for getting this insane project working was Linux on Wii; another piece was the fact that the Wii and late versions of Mac OS Classic both use PowerPC processors. It doesn’t work perfectly, but as they say, it’s amazing that the Nintendog talks at all.

Now, on the Sharp X68000

The SuperGrafx is a failed system that had only five games, only three of which seem to be worth playing. The Sharp X68000 series of high-end personal computers, which were only released in Japan, on the other hand, is probably the popular gaming system Westerners have heard the least about.

As I said yesterday, the X68000 cost three grand, and that was just for the base system. If you thought the NeoGeo was expensive, hah. It’s price was justified in that it was a computer, indeed a workstation, and had a variety of software other than games. But it did still have a lot of games, including some of the best arcade conversions, including excellent ports of Rygar, After Burner, Strider, Final Fight, Street Fighter II and Detana! Twinbee, and a well-remembered recreation of the original Castlevania up to then-current aural and visual ideals. The X68000 even got conversions of Atari arcade games like Marble Madness, and even KLAX, that would I would have loved to have played back then.

The X68000 also worked a lot like a MS-DOS machine from the time. It ran mostly HUMAN68K as its OS, a DOS clone made by HudsonSoft, although it also had windowing OSes. Despite how it seemed in use though, it used Motorola 680X0-family processors, like original iteration of the Macintosh. But while it has a DOS-style OS, it’s a home computer with a dedicated sprite chip!

At times it feels like this blog is a recap of my gaming-related Youtube explorations, but I have no qualms about it when they’re as excellent as the two I have this time. One is a review of the “pro” version system from four years ago, from someone who went and obtained one:

Three years later, RMC returned with a more thorough exploration of a different machine of the line:

And this one is about emulating it, which is probably the closest most of us will ever come to trying out any of its software:

On the SuperGrafx

What is the SuperGrafx? Why don’t we remember it as well as its predecessor, the PC Engine/TurboGrafx 16, with which it was backwards compatible?

Sharopolis on Youtube digs into the system and its capabilities (17 minutes):

As you can tell by the video’s cover image: Amazing Power, No games. The SuperGrafx only had five games released for it throughout its lifetime, pretty harsh for a system that cost around $300 by today’s money. That cost, relative to that of the PC Engine CD, which was also expensive but could play CD games with vastly greater storage, was probably what doomed it. For those really seeking an arcade experience in Japan there was the Sharp x68000, famous at the time as the true enthusiast’s system with a good number of nearly exact arcade ports. It also cost around $6,000 in today’s money, and still $3,000 in then-money.

The system used the same chip as the PC Engine before it, a 6502 variant running at 7 mHz, meaning it was only a 8-bit system. But was that really so bad? The major 16-bit competition for it was the Motorola 68000, another venerable chip at the time that was used in the original Apple Mac, the Sega Mega Drive/Genesis, the Commodore Amiga and the Atari ST. Yet the 68000 also had some more overhead. Many instructions on the 6502 completed in from two to four cycles, whereas the minimum cycle count of a 68000 instruction was four, with some taking up to 20. This, of course, is offset by the 68000’s greater number of registers and ability to work with two bytes at once for many instructions.

Its graphics were essentially two of the PC Engine’s graphics chip, with some circuitry to interface their outputs together. This description brings uncomfortable reminders of people deriding the Wii’s graphics as “two Gamecubes taped together,” but it’s a much closer description of the SuperGrafx’s graphics. But in practice this meant twice the sprites, dual-plane backgrounds, and double the potential colors on-screen at once, while the MegaDrive/Genesis infamously was still stuck with 64.

The SuperGrafx’s failure in the market was one of those inflection points of the growth of video gaming. If it had succeeded then NEC might still be a player in gaming today, and maybe Hudson Soft would still be an independent entity, instead of just another property for Konami to mine for nostalgiabucks.

A Non-Invasive Gameboy HDMI Adaptor

This one’s crazy. The Gameboy does not have external video output. In order to get its display to appear on a screen other than its built in LCD dox matrix, you absolutely have to at least crack open the case. Don’t you?

Well, actually, yes, if you always want a perfect image. Sebastian Staacks (an awesome name) figured out a way to do it that mostly works. It’s a cartridge that goes into the Gameboy, that itself has a slot into which you plug the cartridge that you wish to play. Simple, right?

No, no, wait. There’s a problem. The Gameboy doesn’t expose its video through the cartridge port. There is no pin leading out providing a video signal that can be converted for display. There’s no way this could work!

Well, there is a way, kind of. The device contains a Raspberry Pi that runs its own Gameboy emulator, that it tries to keep synced with the version running on physical hardware. It does this by watching bus activity exposed to it through the cartridge port!

But while there’s a lot that it can do with this information, there’s also a lot it can’t see. It can’t, for example, see directly what buttons are being pressed. However, by watching how the cartridge reads the cart ROM, it can deduce what inputs were pressed.

The process is not perfect. While it can spy some memory accesses, a few things escape its inspection. While it can recreate the layout of the starting blocks in Tetris Game B, it can’t catch their randomized appearances. Also, while a Raspberry Pi is much faster than a Gameboy, it’s not fast enough to carry out its display in the same frame as the main unit, so it lags behind a couple of frames. Still though, it’s a very clever idea, and it’s amazing that it works as well as it does!

Sebastian made a Youtube video explaining and showing off his work, here. (It’s the same one embedded above.)

There Oughta Be A Game Boy Capture Cartridge

Guide to the SNES Architecture

Image from the site

Rodrigo Copetti has an interesting rundown of the architecture to the Super Nintendo Entertainment System! It’s an interesting system over all. In clock speed it’s really not that much faster than an NES, but it has vastly superior graphic and sound capabilities, plus so much more addressing space that the phenomenon of mappers that ruled nearly every NES game worth talking about (except maybe Super Mario Bros. and Tetris) was completely absent. The SNES did have frequently-used add-on chips, but they tended more to take the form of co-processors to take some of the load off of the machine’s relatively slow CPU.

Super Nintendo Architecture: A Practical Analysis by Rodrigo Copetti