
Arcade Mermaid is our classic arcade weirdness and obscurity column! Frequently (no promises) we aim to bring you an interesting and odd arcade game to wonder at.
Because I’m out of town for a few days, we’re continuing our week-long coverage of Atari Games’ brilliant, yet really hard classic arcade strategy game Rampart.
Each of Rampart’s phases has its own considerations, so let’s take them one at a time.

Battle Phase
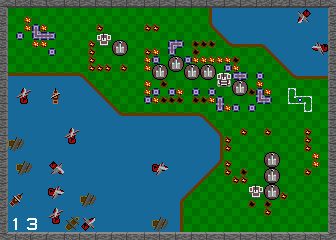
Rampart’s most traditional mode is its Battle sequence, which plays a bit like Atari’s old hit Missile Command. For a limited amount of time, players use the trackball to move a crosshairs around the screen, and the Fire button launches a cannonball from one of their cannons aimed at that spot.
Cannonballs have a set speed that they travel as they move through the air; nearby shots go directly towards the destination, but distant targets travel in a high arc. Thus, more distant shots take much more time to reach their targets, due to the fact that they have to be angled upward.
The speed of your shots matters for two important reasons. First, in single-player mode, enemy ships don’t always sit still and let your projectiles sink them, but move around at different speeds, and sometimes even try to dodge your shots. One of the most annoying events in Rampart is when you launch a volley towards a ship, and it decides to pull anchor and float elsewhere just as your shots launch, wasting those precious missiles. Firing at close-up ships means you don’t have to lead your targets by nearly as much, and reduces the chance that a ship will just sail out from under your projectiles.
The other important thing is, each cannon can only have one shot in the air at a time. Firing at nearby targets means you can get more shots off during a Battle phase. The combination of the two, being more accurate when shooting moving targets and getting more shots off, means that, absent other issues, you should prioritize firing at ships near your guns.
You cannot entirely erase the chance that a ship will decide to start, or stop, moving after you launch shots towards it, but there is some finesse that can be applied. Ships always sail in a straight line in one of the eight cardinal/diagonal directions, and ships cannot move through other ships. If a moving ship runs into another one, it will stop. They cannot turn around while in motion, but must wait until their invisible captain picks a new direction, which could be immediately or never. They also stop if they reach the shoreline, which for a Lander could be very bad for you. Once in a while a moving ship will just stop for no reason. The only constant is, all ships stop moving at the very end of the Battle phase, once all cannonballs have landed.
The rules of cannonfire, the ones concerning shot speed and there only being one shot in play at a time per weapon, they also apply to the enemy ships. Nearby ships are able to launch more shots at closer walls than distant ones, another reason to prioritize shooting nearby ships. But this must be balanced against those times when you need to prevent a landing, or take out some Red Ships to make the Build phase more survivable.
The game continues no matter how many ships you sink in Battle, but to progress to the next level, and eventually win the game, it’s advantageous to sink ships. The exact qualification for finishing a level is unknown, but it seems to happen after you wipe out most of the ships on-screen.
There is a maximum of 16 ships that can be in play at any time. If that number is reached, but there are some weakened or Single-Sailed Ships on-screen, Rampart is known to remove some of them so stronger ships may enter the fray.

Building Phase
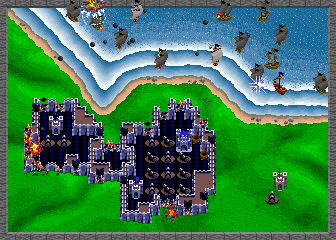
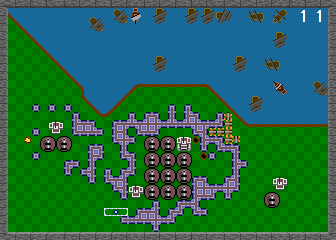
This is the meat of the game. While shooting ships eventually clears levels, you can’t do that without cannons, and cannons are awarded from skill at building. Also, if you fail to capture at least one castle in a round, you lose.
The way it works is, the game hands you an assortment of building pieces of various shapes, one at a time. The pieces you’re given first exist as just a flashing outline that you can maneuver freely over the land with the trackball or joystick. You can move it anywhere while you’re getting it into position, or rotate it clockwise with a press of the “Rotate” button. (If you start out your first building phase without using the button, the game’s voice will suddenly intone, “Use ROTATE for a better fit!” Rampart doesn’t have nearly as much digitized speech as Gauntlet, but it sure is memorable when it does speak.)
The difficult bit is, you cannot place pieces anywhere there is something per-existing. A piece cannot be placed if any part of it overlaps with another wall, the shore, a castle, a cannon, a crater, a grunt, or the edge of the screen. Everything visible beneath the piece’s outline must be the clean, green checkerboard of countryside.
You must place the current piece before you get the next one. Intermediate Rampart players ruefully observe that the game tends to hand out just the wrong piece they need at a given time. A lot of this is observation bias, you don’t tend to notice the times when the game hands you just the right piece, but it’s true that the pieces the game has to hand get larger and more complex as the game continues.
When a piece is plopped down it turns into wall. If the wall adjoins wall pieces already extant, they’ll join together pleasingly into a solid-looking structure. Your task is to connect wall pieces together like this until you have a complete loop all the way around and enclosing at least one castle. Usually you want this castle will be the one you start with, called your “Home Castle.” It’s worth extra points and cannons if you capture it, but any castle will allow you to survive.
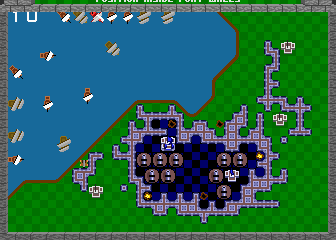
There are two particular hassles in the Building phase that deserve special mention. The first are those grunts the Landers sometimes drop off if they reach the shore, and that have the power to move around during Building. They look like tiny tanks, or little battering rams.
Grunts move during Building, meaning they can actually block pieces just as you’re trying to place them. They not only move, but slowly multiply as they go, tending to form lines between the shore and your castles. Worst of all, grunts that make it to your castles have the power to destroy them during the following Battle phase, the only thing in the game that can harm a castle itself.
Grunts are so dangerous that landings must quickly be dealt with or else your game will soon be over. You can shoot them during the Battle phase, or you can surround the territory they’re on, destroying them instantly with a satisfying crunching noise.
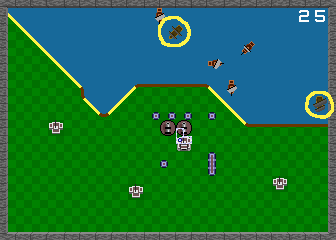
One important thing to note about grunts is that they can’t be dropped off just anywhere. Landers (here circled) can only leave grunts on diagonal shorelines. Highlighted above are the landing sites on the “Hat” map. Guard them at all costs.
The other problem you must worry about during Building is craters, flaming pits in the very ground left when the red cannonballs launched by Red Ships strike your wall. A crater is an implacable obstacle; there is no way to remove a crater from the board other than time. Near the end of the game, depending on the randomized ship generation, you may end up with rounds where you must face six or more Red Ships at once, which is horrifying.
When a crater is formed, it’s a full-strength pit of fire. Every Battle phase, each crater diminishes a bit. They all do this in lockstep: all the craters formed in one round will advance to the next state at once.
How does the game decide how quickly to make craters disappear? It’s a function of how recently you’ve put in money and continued the game! If you’ve recently continued, then for a while the game makes craters disappear in two rounds instead of three.

Cannon Phase
The Cannon phase is much less tense than the others. You get ten seconds to place additional cannons for subsequent Battles. But placement of cannons is one of the most important decisions of all. In a sense, the reason you’re capturing castles, beyond mere survival, is to support your artillery.
For the first Cannon phase of the whole game, the game gives you three cannons to get you started. On the first Cannon phase after continuing, you get four, as part of the “and more firepower” the game promises. On the first round of other levels, you start with just two.
Beyond that, on each successive Cannon phase, you get two more cannons to place for having captured your home castle, and one more for each other castle. But this only happens if you have room to place them. When surrounding castles in the Building phase, you must not only survive, but try to leave extra room for placing cannons, that is, if you want more artillery.
The more cannons you have, the more shots you can get off in the Battle phase, and thus the more of a dent you can put into the enemy navy and/or other players’ walls. This, in turn, decreases the shots coming in towards your walls, lets you do something about Landers before they drop off Grunts, lets you shoot at Grunts directly, allows you to sink more Red Ships before they set your whole countryside ablaze, and ultimately depletes the opposing navy faster.
Lots of cannons mean lots of shots! Shots can stop landings, clear out Red Ships, and hasten the end of the level.
But cannons are also a big problem. Each cannon you place is a 2×2 square of ground that cannot be otherwise built upon, which restricts the shapes of pieces that can fit on the ground. Having lots of cannons progresses you through the level, but increases the area you have to surround to survive.
Practically, you must build at least some cannons directly adjacent to your castle, and other cannons adjacent to those, in a big sulfuric blob. Thus, to capture that castle, you’ll also have to capture all the cannons that adjoin it, a mass of guns that grows in size with each round. And in case you come up with the idea to build cannons away from castles to avoid this, you should know that cannons that aren’t “owned” during a battle phase sit idle, doing nothing.
A “summer home” is a secondary castle you turn to in order to survive, usually with cannons attached, when your home castle is too difficult to recover.
You must have cannons to survive through each level, to punch back against the enemy, to take care of threats and eventually to advance towards finishing it, but having them makes later Building phases harder. Once a cannon is placed, it cannot be removed except by losing and continuing the game. And not having any cannons is a counter to using the “summer home” strategy for every round: while you can often abandon your home castle and its armaments in favor of a small unadorned dwelling out in the sticks, unless you’ve built cannons there on previous rounds, you’ll have, at most, one gun to thwart landings. A lot of games have ended due to this.
One subtle aspect to Rampart strategy is the cannon firing order. Cannons fire in the order in which they were placed. Any uncaptured cannons, and also cannons with shots in the air, are ignored in the queue. The difference in lead time between a cannon near the shore, and one way back at the screen edge, is significant, and can result in a lot of missed shots. To thwart this, it helps to try to build cannons in one mass, instead of spread out, and to try to build in more centralized locations, but truthfully it’s difficult to consciously make use of this strategy during a game.
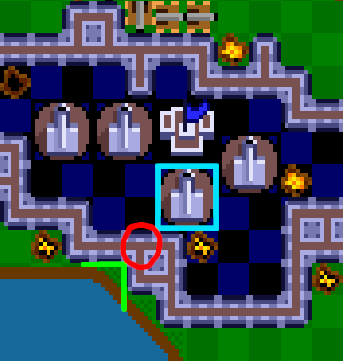
This is a danger spot, a location where, if a single Red Cannonball hits, it renders the whole castle and its cannons impossible to capture.
One thing that players cannot afford to ignore is the danger of building cannons too close to the water or the edge of the screen. This is a huge concern. Building cannons close to hard barriers like those greatly reduces the number of pieces that will fit between the gun and the obstacle, and increases the chance that a red cannonball will hit in a such a place as to create an impossible rescue. To the game’s credit, Red Ships do not appear to target these locations intentionally, but neither do they avoid them, so It’s important to try to leave at least two spaces between cannons and any hard barriers, and more if you can. Especially look out for one-space diagonal separation, because it isn’t as obviously dangerous as horizontal or vertical. The more free space around your installations, the easier it’ll be to build walls there later, and the better off you’ll be.
So what if you decide you have enough cannons and don’t want to place some or all this round, do you have to sit and wait out the clock? Why, no: if you make five consecutive illegal cannon placements in a row, the game will take that as a signal that you’re done placing them and end the Cannon phase immediately.
That’s three parts so far! Yes, there’s more to say about this diabolical game, but we’ll take a break for a couple of days, for other posts. See you soon!