I am a sucker for a bargain. If something is 90% off I’ll often buy it if I have little interest in ever playing it (that’s how I ended up with the Borderlands games, don’t tell anyone). And if you keep your eyes open, you can build quite a game library that way.
I made a list of everything on my Nintendo Switch account: <b><u><i>two hundred and seventy-one items</i></u></b></ironicfakehtmltag>. Some day I’ll give you the list, but not today. But I figured it’d be useful to people if I reported on some notable deals happening on the eShop from time to time. Nintendo doesn’t pay me to do this, and any links you use earn me nothing, it isn’t advertising. And only items that catch my eye, and survive the crushing wave of ennui these tasks produce, make it into this list.
Note 1: I round off most prices. I count every keypress dearly, and typing “.99” over and over again pours caustic soda on my remaining nerve endings.
Note 2: I use em-dashes in this. That is not proof I am some idiotic LLM, you adjective[entire] derisive noun[breadbin].
Note 3: A foundational requirement for being included in this list is it must be at least half off.
Note 4: No screenshots or covers this time. I’ve just been up all night tracking down Japanese words in the Super Famicom version of Shiren the Wanderer, my neurons are floating in a thick soup right now.
Ahem:
General
The Wonderful 101 Remastered ($18, 55% off) — One of the most beloved games for the Wii-U, and contains a superhero character called Wonder Toilet, I say approvingly.
Dokapon: Sword of Fury ($12.50, 50%) — new entry in the cult JRPG-styled board-and-party game series.
Save Me Mr Tako: Definitive Edition ($3, 80% off): A rerelease of another Switch game that, I hear, was sabotaged by its original publisher. A challenging-yet-cartoony pixel art platformer with Game Boy graphics about an octopus hero, with a more involved story than you might expect. It’s three bucks, what have you got to lose?
Capcom
Resident Evil 4 ($10, 50% off) — The entry on the site spells “Resident Evil” all in lowercase for some stupid marketing reason. It’s widely acknowledge that this port of a Gamecube title is a high-point in the series, and contains zero percent zombies by weight. A lot of Resident Evil games seem to be on sale right now in fact, along with the Monster Hunter series, but I’ll leave those for you to seek out if you want them.
Street Fighter 6 (Switch 2 version, $20, 50% off) — After a dalliance with SoulCalibur back on the Dreamcast, and a ridiculous amount of time spent training amiibo fighters in Smash Ultimate, I’ve largely stayed away from fighting games. Still, it’s nice to see a classic series survive.
AKKA ARRH ($6, 70% off): To think AKKA ARRH finally saw commercial release decades after the old Atari passed on producing its prototype, and this version was developed by Jeff Minter himself. But how do you pronounce it? Like a pirate? ARRRRRH.
A lot of SquareEnix games are on sale at the moment. Collection of Mana ($16, 60% off) — Three games, Final Fantasy Legend (Game Boy), the beloved Secret of Mana (SNES) and the heretofore unreleased-in-English Seiken Densetsu III, now christened Trials of Mana. Sadly Trials, unlike Secret, doesn’t support three human players, not even in its original version, but it does offer a lot of replay value with multiple scenarios to complete.
A while bunch of Final Fantasy games are currently on sale, too many to link them all. VII is $6.39 (60% off); IX is $8.39 (also 60% off). On the Enix side of the building, Dragon Quest XI S: Echoes of an Elusive Age ($20, 50% off) is interesting. There’s also four Kingdom Hearts games with typically silly names, like HD 1.5 + 2.5 ReMIX ($16, 60% off), but be careful, many of them are cloud versions that won’t work without an internet connection. There’s also Octopath Traveler and its sequel (both $24, 60% off) and Romancing SaGa 2 ($7.50, 70% off), among others.
It makes the useful observation that the first programmable game system (that is, with interchangable cartridges that contained program code), the Fairchile Channel F, contained 2K of RAM to use as a framebuffer, a region of memory the system’s graphics controller referred to in building its display. Using a framebuffer simplifies video creation, but at the time RAM was very expensive.
The Atari VCS/2600, however, only has 128 bytes of on-board RAM. It doesn’t create a framebuffer, it doesn’t have enough memory. Instead the processor, a MOS 6507 (a variation of the 6502), works with the TIA graphics chip to build the signal in real-time. Effectively, the VCS has a one-dimensional display: it focuses on building the video signal by focusing on it one raster line at a time.
There’s a danger when talking about these things, of telling people something they already know. It’s been observed that some game facts that were once obscure are fairly well known among enthusiasts, like that Super Mario Bros. 2 was adapted from an earlier Japanese game called Doki Doki Panic. I feel like the unusual way the VCS constructed its graphics might be one of these things. I’m still fascinated by how it works though. I’ll probably end up bringing it up again someday.
I’ve been working a lot on compiling lists of programs that appeared in Loadstar, and it’s taking a lot of time. So here’s a quick item for today: a visit by the news team of CBS 8 in San Diego to Atari’s headquarters. 12 minutes from the company heyday in 1982, when they were riding high off the success of the Atari VCS/2600 and their many beloved arcade titles.
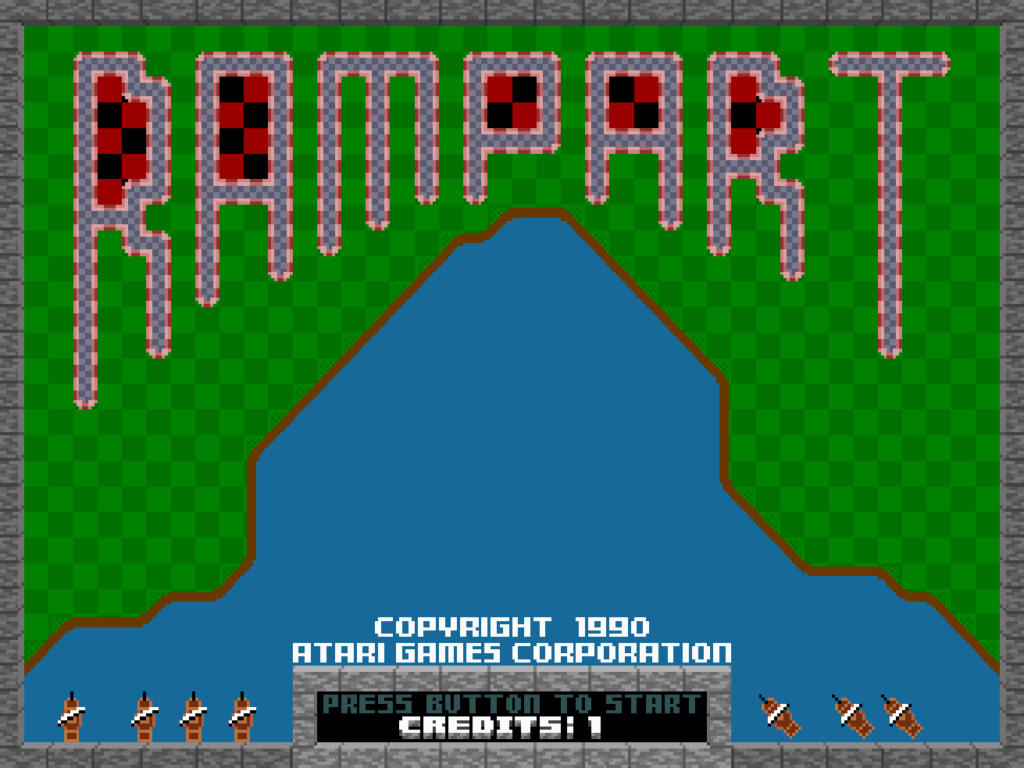
Perhaps it’s a bit self-indulgent, but I’ve found a playthrough by someone other than me of the arcade version of Rampart, and decided to spotlight it. It’s a game that seems fondly remembered by some, and doesn’t seem to have sold badly. It has a baker’s dozen ports for a wide array of consoles. But no one, besides me, seems to talk about it any more, and until this video I was the only person of whom I have knowledge of completing the arcade version.
Even the MAME people needed my help to correct a game-breaking bug in the Rampart driver, because no one on the project could play Rampart well enough to get to that level. I don’t say this out of pride, but rather of sorrow. Other than its creators, I am probably the person in the world who knows the most about it. For more info, I point you to our Rampart tag.
On the video, there are caveats. The first one is I didn’t exactly it, but instead, Youtube’s vaunted algorithm has filed to hide it from me, because it’s six years old yet my searches haven’t turned it up to me until now. Sometimes I wish Google would stop showing me things it thinks I’d like and instead for a change found something I’ve explicitly asked it for.
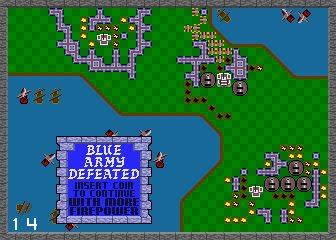
Second, it’s by a Japanese speaker, of the Japanese version of Rampart. That was a two-player maximum version with joysticks, and from watching it, I can tell you it’s much easier than US Rampart. The player gets more time to rebuild, levels are easier to pass, grunts are less aggressive, and the game doesn’t pour on the Flagships, the red ships, with anywhere near as much energy in the last two levels. They manage to finish the game in one credit, something I’ve never done on the US version, but I strongly suspect I could do it too on that version, and fairly easily.
Still, it’s someone other than me who has a complete game on Youtube, in however many credits. It’s played on arcade hardware too, which I haven’t been able to do since Rampart was at our local arcade, back when that place existed, around 1991 or 1992. Here is that play (57 minutes):
I really don’t want to detract from their game, bit I’m a bit disappointed. I’ve played Rampart, mostly in MAME but sometimes on the Gamecube version of Midway Arcade Treasures, and on one particular DragonCon I played the PS3 version (there’s something of a story there). Every time, I’ve had to fight against bad luck and the most diabolical impulses of designers john Salwitz and Dave Ralston. Sometimes I win and sometimes I lose, but, ever, only I care.
The search for other people who have finished the US version of arcade Rampart continues.
Late addition: I have more discoveries to offer on this matter, but I have to figure some things out first. To be continued….
You do a daily blog, you plan a post for a day, and sometimes it doesn’t work out. It happens. Today’s post was going to be a romhack but it turns out it didn’t meet my fairly high standards for romhacks. I’m really picky about them. It was a Super Mario World hack with a strong and interesting theme, I was excited about writing about it, then there was a long jump that required bouncing off a flying turtle right in the first level, and that was right after a couple of tight jumps out from beneath two Thwomps with Podoboos jumping all around, then when I finally got by it, there was a room where water was unexpectedly instantly lethal, as if it were spikes. I don’t have time for that.
I play these things to write about them, but I played for fun too, and that kind of business I don’t consider fun, and I don’t think you’d enjoy it either. Games are meant to be fun, not excruciating tests.
I won’t give you the name of the hack because it’s one of hundreds that are like that. I have nothing against its creator, artistically it didn’t look bad. It just was a pain to play.
So instead, have a 2017 interview on Atari Compendium, with long-time Atari Games programmer Michael Albaugh. It’s all text, but I’ve been meaning to ease up on the number of Youtube videos I link. Don’t worry, I’m still going to bring you tons of them, because for worse or even worse, there’s a lot of gaming content there, and Google certainly likes pointing me to it, may them and their “AI Summaries” boil in oil.
Michael Albaugh (image from Atari Compendium)
Albaugh played the original commercial arcade game Computer Space in a Sears department store in 1974, soon after joined with Atari Inc. while Nolan Bushnell was still at the helm, and stuck with them through to 2000, just a few years before WMS shut them down. The first game he wrote code for was Pool Shark, a black-and-white machine released soon after Tank 8. His last (according to MobyGames) was Gauntlet: Dark Legacy, and support on San Francisco Rush: 2049! He worked on Atari Football, Marble Madness and Rampart. In games, there are very few careers longer than that, and I’m glad that he is telling his story.
I’d like especially to point out his concluding statement:
Cliche, but it went from a craft with small, tight groups, like a local theater company, to more like Hollywood, with giant teams and management structure that would make the Pentagon swoon. And of course a real hit-driven, cautious agenda. In short, no thanks. There are still interesting things going in the demo scene, indie games, and interactive fiction, though.
It’s true! Thanetian Gaming on Youtube has an 18-minute video about Atari Games’ neglected classic Rampart. Remember back in September when I posted a strategy guide that no one asked for over four days? Judging by his video he could stand to read it, but no matter, I’ll accept anyone talking about my favorite arcade game in a positive light!
Recently I’ve been working on a getting-started guide on what I think is one of the most interesting games in UFO 50, Pilot Quest. (Other games I’ve really enjoyed, though I’ve by no means tried every game in the collection yet: Magic Garden, Waldorf’s Journey, Planet Zoldath, Attactics, Kick Club, Onion Delivery, Porgy, Valbrace, Grimstone and Mini & Max.)
Guides take time, so in the meantime here’s an hour-long talk by Ed Logg on the creation of Gauntlet, from GDC 2012!
Arcade Mermaid is our classic arcade weirdness and obscurity column! Frequently (no promises) we aim to bring you an interesting and odd arcade game to wonder at.
Yes! More Rampart! I’m still out of town at DragonCon so I’m repurposing an old strategy guide I wrote for Extended Play into a week of posts. Even I’m starting to get sick of Rampart by now, but please stick around. And if you’ve ever tried playing this infuriating game in the arcade, this might give you the advice you need to get through to levels you might not have thought possible! And this is even a fairly short post!
Level Strategies
Level One (“Recruit”)
Castles available: 6
It’s advised not to start on this level unless it’s your first game. You’ll not only miss out of 5,000 points by starting here, but it means the beginning of Level 2 will begin you with only two cannons instead of three, and you’ll face more ships.
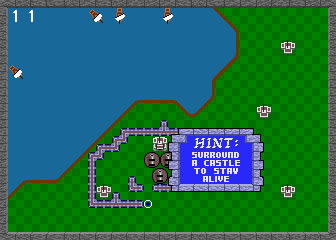
This level is so easy that it barely rates mention. It has six castles, and only Gunships appear. Unless you’re purposely stalling, you’ll finish this map in two rounds. Even if you stall, the level auto-completes in three rounds, regardless of if you fire a single shot.
Another reason to avoid picking Beginner is that its selection is always the “J” map, which is one of the easier selections from the initial four boards. It’s better if you pick it later, when the opposition is harder, to balance out the difficulty.
Level Two (“Veteran”)
Castles available: 5
The Veteran level is randomly chosen from one of the other three basic maps, although it tends to be the “C” map most often. Ideally it won’t be the “Hat” map, it being the easiest, as you’ll want it to be your Level 4.
If you started on the board, the first round will always put you up against four ships, one of which may be a Lander. Later ships are frequently also Landers. As a result grunts may appear on this board, but even if some appear, so long as you focus on destroying enemy ships and don’t suffer major setbacks like losing your home castle, you’ll probably wipe out the attackers before they become a huge problem.
On a later round in this level you’ll probably encounter your first Red Ship. A Red Ship tends to get off two or three shots in a round, each producing flaming crater you must build around.
Level Three
Castles available: 5
You always get to pick this level yourself. I usually try to make it “C,” “J” or “Hat,” in that order. I usually avoid picking “N,” but it’s not really harder than “C,” so pick whatever is your preference.
Much of the fleet will be Landers here, so this is the first level where you must be diligent about thinning out their numbers. Especially try to take care of ships about to land; grunts are unwelcome visitors to deal with, and it’s best if they never show up at all. In the event of a landin, which is sometimes unavoidable, try to spare a few seconds to build a barrier to them, to wall them off from the rest of the board. If you can contain them in a small area around the landing, you can keep their numbers down that way and thus reduce the number of shots you must expend in cleaning them up. Don’t think you can just let them be! They will overwhelm you easily if you ignore them.
I try to pick a home castle that’s near another castle, so I can capture them both with one wall. If you can consistently get both each round, that’s three cannons each time. Use them to connect the space between the two castles, but try to keep that space as small as possible. Try to aim for the minimum-sized rectangle needed to save both of them, and then try to place all your cannons within that rectangle.
Level Four
Castles available: 4
Now the game starts to get serious. If you can get here on your first credit you’ve done very well, but your weak basic guns will become more and more of a liability for you. Dark ships start appearing on this level, and will continue to appear until the end of the game. They all take one extra hit to sink. That’s three hits for Gunships, four for Landers, and six for Red Ships.
Try to make Landers that have a chance of landing at a diagonal shore your top priority. If one makes it through, then at the start of the Building phase devote three seconds or so it blocking their progress with walls. If they get away from the shore and a significant number appear, then focus on surviving and shoot them with cannons during Battle. Red Ships start to be a significant threat here. Once all the potential landings are taken care of, try to pump six shots into a Red Ship.
Level Five (peninsula)
Castles available: 3
Regardless of how you got here, you have a choice between two new maps for this level, a diagonal peninsula going upper-right to lower-left, or one going from upper-left to lower-right. I call these the “slash” and “backslash” maps, respectively. I usually pick backslash, but both are about the same difficulty.
These maps have the property of having two seas, a small one at the top of the screen and a more typical larger one at the bottom. The small water region is both a blessing and a curse; the restricted movement makes it easier to destroy ships there, but landings are very likely unless you clear out the Landers arriving there. What is more, these maps are the only ones in the game that break the rule about landings only being possible on diagonal shores. Landers in the small sea are also counted as landed if they contact land at the very edge of the screen, even if there’s no diagonal shore nearby. This property doesn’t extend to screen-edge landings in the larger sea.
The worst thing about these levels is that the game takes off the limiter on the number of Red Ships that can be generated each round. Red Ships here are nearly as common as Double-Sailed ones! You’ll frequently see seven or more on-screen at a time. While you must remain vigilant to prevent and/or mitigate landings, you must also work towards reducing the number of Red Ships. The large number of flaming craters on these levels made adopting a “summer home” strategy imperative, where you switch off between castles when one gets too difficult, or even impossible, to save. It’s usually a good idea to try to capture two castles in the first round because of this; then you can station some or all of your cannons for that round at the other castle, so you’re not defenseless when you’re forced to turn to it for survival. From there, you can focus on getting cannons around the third castle for maximum safety.
This level is a strong test of your Rampart skills, and often is a barrier to progression until you’ve played many games. But it’s not invincible. On Easy difficulty, I’ve passed this level still on my first credit multiple times. The biggest thing you have to worry about is the high probability of impossible situations.
Consider: when any castle is adjacent to other objects, you must capture the whole collection as a set. Chains of objects like this increase the difficulty of getting the whole thing, and increases the odds of getting an impossible save. I’ve seen this happen after even the first round on a peninsula board, and I’ve seen it happen on all three castles on one of these maps at the same time. The only substantive thing you can do, besides rotating between castles, is to shoot some of the dangerous walls yourself. Red Cannonballs don’t leave craters if the wall is already destroyed, but that takes time and often makes for a difficult repair.
So, what if you manage to clear this map? What happens next? The game scrolls the FINAL BATTLE banner, and you get a one-way ticket to:
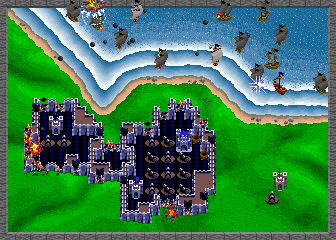
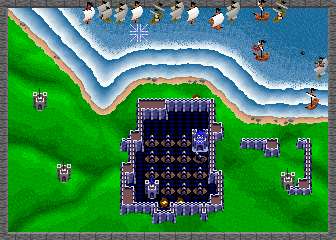
Level Six (island)
Castles available: 2
It all comes down to this. This level is a special kind of hell, only slightly mitigated by the fact that it seems you can get away with sinking fewer ships here, and, because you’re surrounded on all sides, your shots often don’t have that far to travel to reach a ship. There are four prime landing areas, each in one corner of the map, so landings can only be delayed, not prevented. And you only get two castles. Enjoy!
When you start looking more closely at the map, some slight advantages become apparent. There’s a lake in the bottom-left of the board, which gets in the way, somewhat, of grunts approaching from the bottom. Both castles have a good amount of land around them, although there are so many Red Ships here that the “summer home” strategy is essential to survival.
The continue limit eases up a little bit here. If you were at the maximum of four continues upon starting Level Six, the game will grant you an extra continue when you get here. (You still have to pay your coins for it though.) And also, if you were at that final credit, the game will actually downgrade your cannons one step when you get here, so get used to expending two/three/five shots for Gunships/Landers/Red Ships again. If (ha ha, “if”) you do expend that last continue, you go back to only needing one/two/four shots to sink ships. (There is more information on the effects of continues on cannon power in the notes, later on.)
This level is an ordeal, but it can be finished surprisingly quickly. I’ve seen it cleared in three rounds, although that was after several continues (it had been a pretty great game up to that point). This level is the big obstacle to one-credit clears, I’ve managed to finish everything up to it on one credit only to bang my head against it repeatedly. Using save states, I’ve managed to finish it with a single continue, so it is possible to finish it relatively cheaply, but making do with such weak cannons is a real challenge.
Arcade Mermaid is our classic arcade weirdness and obscurity column! Frequently (no promises) we aim to bring you an interesting and odd arcade game to wonder at.
Because I’m out of town for a few days, we’re continuing our week-long coverage of Atari Games’ brilliant, yet really hard classic arcade strategy game Rampart.
Each of Rampart’s phases has its own considerations, so let’s take them one at a time.
Battle Phase
Rampart’s most traditional mode is its Battle sequence, which plays a bit like Atari’s old hit Missile Command. For a limited amount of time, players use the trackball to move a crosshairs around the screen, and the Fire button launches a cannonball from one of their cannons aimed at that spot. Cannonballs have a set speed that they travel as they move through the air; nearby shots go directly towards the destination, but distant targets travel in a high arc. Thus, more distant shots take much more time to reach their targets, due to the fact that they have to be angled upward.
The speed of your shots matters for two important reasons. First, in single-player mode, enemy ships don’t always sit still and let your projectiles sink them, but move around at different speeds, and sometimes even try to dodge your shots. One of the most annoying events in Rampart is when you launch a volley towards a ship, and it decides to pull anchor and float elsewhere just as your shots launch, wasting those precious missiles. Firing at close-up ships means you don’t have to lead your targets by nearly as much, and reduces the chance that a ship will just sail out from under your projectiles.
The other important thing is, each cannon can only have one shot in the air at a time. Firing at nearby targets means you can get more shots off during a Battle phase. The combination of the two, being more accurate when shooting moving targets and getting more shots off, means that, absent other issues, you should prioritize firing at ships near your guns.
You cannot entirely erase the chance that a ship will decide to start, or stop, moving after you launch shots towards it, but there is some finesse that can be applied. Ships always sail in a straight line in one of the eight cardinal/diagonal directions, and ships cannot move through other ships. If a moving ship runs into another one, it will stop. They cannot turn around while in motion, but must wait until their invisible captain picks a new direction, which could be immediately or never. They also stop if they reach the shoreline, which for a Lander could be very bad for you. Once in a while a moving ship will just stop for no reason. The only constant is, all ships stop moving at the very end of the Battle phase, once all cannonballs have landed.
The rules of cannonfire, the ones concerning shot speed and there only being one shot in play at a time per weapon, they also apply to the enemy ships. Nearby ships are able to launch more shots at closer walls than distant ones, another reason to prioritize shooting nearby ships. But this must be balanced against those times when you need to prevent a landing, or take out some Red Ships to make the Build phase more survivable.
The game continues no matter how many ships you sink in Battle, but to progress to the next level, and eventually win the game, it’s advantageous to sink ships. The exact qualification for finishing a level is unknown, but it seems to happen after you wipe out most of the ships on-screen.
There is a maximum of 16 ships that can be in play at any time. If that number is reached, but there are some weakened or Single-Sailed Ships on-screen, Rampart is known to remove some of them so stronger ships may enter the fray.
Building Phase
This is the meat of the game. While shooting ships eventually clears levels, you can’t do that without cannons, and cannons are awarded from skill at building. Also, if you fail to capture at least one castle in a round, you lose.
The way it works is, the game hands you an assortment of building pieces of various shapes, one at a time. The pieces you’re given first exist as just a flashing outline that you can maneuver freely over the land with the trackball or joystick. You can move it anywhere while you’re getting it into position, or rotate it clockwise with a press of the “Rotate” button. (If you start out your first building phase without using the button, the game’s voice will suddenly intone, “Use ROTATE for a better fit!” Rampart doesn’t have nearly as much digitized speech as Gauntlet, but it sure is memorable when it does speak.)
The difficult bit is, you cannot place pieces anywhere there is something per-existing. A piece cannot be placed if any part of it overlaps with another wall, the shore, a castle, a cannon, a crater, a grunt, or the edge of the screen. Everything visible beneath the piece’s outline must be the clean, green checkerboard of countryside.
You must place the current piece before you get the next one. Intermediate Rampart players ruefully observe that the game tends to hand out just the wrong piece they need at a given time. A lot of this is observation bias, you don’t tend to notice the times when the game hands you just the right piece, but it’s true that the pieces the game has to hand get larger and more complex as the game continues.
When a piece is plopped down it turns into wall. If the wall adjoins wall pieces already extant, they’ll join together pleasingly into a solid-looking structure. Your task is to connect wall pieces together like this until you have a complete loop all the way around and enclosing at least one castle. Usually you want this castle will be the one you start with, called your “Home Castle.” It’s worth extra points and cannons if you capture it, but any castle will allow you to survive.
There are two particular hassles in the Building phase that deserve special mention. The first are those grunts the Landers sometimes drop off if they reach the shore, and that have the power to move around during Building. They look like tiny tanks, or little battering rams.
Grunts move during Building, meaning they can actually block pieces just as you’re trying to place them. They not only move, but slowly multiply as they go, tending to form lines between the shore and your castles. Worst of all, grunts that make it to your castles have the power to destroy them during the following Battle phase, the only thing in the game that can harm a castle itself.
Grunts are so dangerous that landings must quickly be dealt with or else your game will soon be over. You can shoot them during the Battle phase, or you can surround the territory they’re on, destroying them instantly with a satisfying crunching noise.
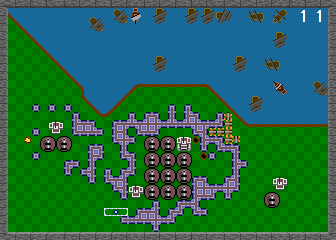
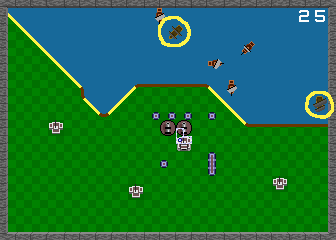
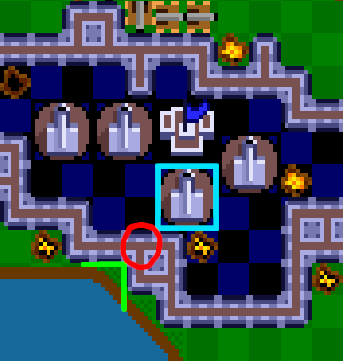
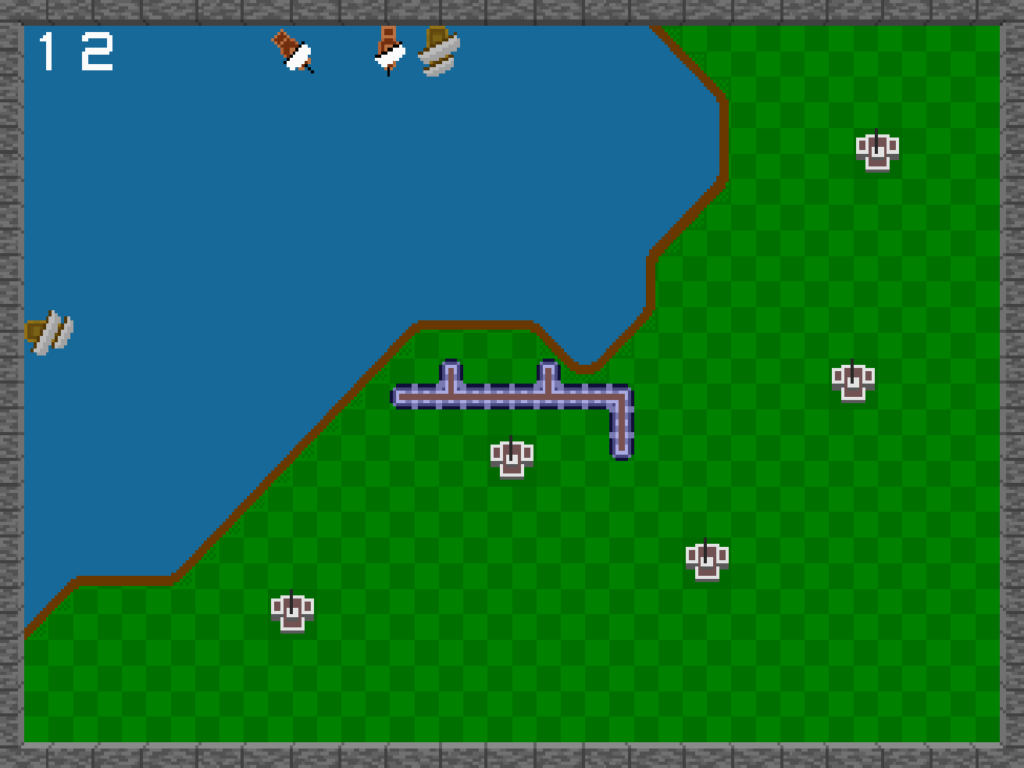
Keep Landers away from diagonal shorelines, or you’ll have a bad time!
One important thing to note about grunts is that they can’t be dropped off just anywhere. Landers (here circled) can only leave grunts on diagonal shorelines. Highlighted above are the landing sites on the “Hat” map. Guard them at all costs.
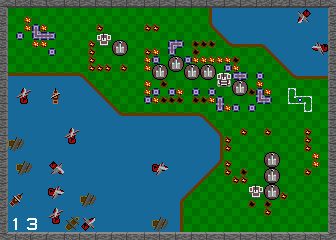
The other problem you must worry about during Building is craters, flaming pits in the very ground left when the red cannonballs launched by Red Ships strike your wall. A crater is an implacable obstacle; there is no way to remove a crater from the board other than time. Near the end of the game, depending on the randomized ship generation, you may end up with rounds where you must face six or more Red Ships at once, which is horrifying.
Caused by too many craters left by Red Ships, this situation cannot be survived. Can you see why?
When a crater is formed, it’s a full-strength pit of fire. Every Battle phase, each crater diminishes a bit. They all do this in lockstep: all the craters formed in one round will advance to the next state at once.
How does the game decide how quickly to make craters disappear? It’s a function of how recently you’ve put in money and continued the game! If you’ve recently continued, then for a while the game makes craters disappear in two rounds instead of three.
Cannon Phase
The Cannon phase is much less tense than the others. You get ten seconds to place additional cannons for subsequent Battles. But placement of cannons is one of the most important decisions of all. In a sense, the reason you’re capturing castles, beyond mere survival, is to support your artillery.
For the first Cannon phase of the whole game, the game gives you three cannons to get you started. On the first Cannon phase after continuing, you get four, as part of the “and more firepower” the game promises. On the first round of other levels, you start with just two.
Beyond that, on each successive Cannon phase, you get two more cannons to place for having captured your home castle, and one more for each other castle. But this only happens if you have room to place them. When surrounding castles in the Building phase, you must not only survive, but try to leave extra room for placing cannons, that is, if you want more artillery.
The more cannons you have, the more shots you can get off in the Battle phase, and thus the more of a dent you can put into the enemy navy and/or other players’ walls. This, in turn, decreases the shots coming in towards your walls, lets you do something about Landers before they drop off Grunts, lets you shoot at Grunts directly, allows you to sink more Red Ships before they set your whole countryside ablaze, and ultimately depletes the opposing navy faster.
Lots of cannons mean lots of shots! Shots can stop landings, clear out Red Ships, and hasten the end of the level.
But cannons are also a big problem. Each cannon you place is a 2×2 square of ground that cannot be otherwise built upon, which restricts the shapes of pieces that can fit on the ground. Having lots of cannons progresses you through the level, but increases the area you have to surround to survive. Practically, you must build at least some cannons directly adjacent to your castle, and other cannons adjacent to those, in a big sulfuric blob. Thus, to capture that castle, you’ll also have to capture all the cannons that adjoin it, a mass of guns that grows in size with each round. And in case you come up with the idea to build cannons away from castles to avoid this, you should know that cannons that aren’t “owned” during a battle phase sit idle, doing nothing.
A “summer home” is a secondary castle you turn to in order to survive, usually with cannons attached, when your home castle is too difficult to recover.
You must have cannons to survive through each level, to punch back against the enemy, to take care of threats and eventually to advance towards finishing it, but having them makes later Building phases harder. Once a cannon is placed, it cannot be removed except by losing and continuing the game. And not having any cannons is a counter to using the “summer home” strategy for every round: while you can often abandon your home castle and its armaments in favor of a small unadorned dwelling out in the sticks, unless you’ve built cannons there on previous rounds, you’ll have, at most, one gun to thwart landings. A lot of games have ended due to this.
One subtle aspect to Rampart strategy is the cannon firing order. Cannons fire in the order in which they were placed. Any uncaptured cannons, and also cannons with shots in the air, are ignored in the queue. The difference in lead time between a cannon near the shore, and one way back at the screen edge, is significant, and can result in a lot of missed shots. To thwart this, it helps to try to build cannons in one mass, instead of spread out, and to try to build in more centralized locations, but truthfully it’s difficult to consciously make use of this strategy during a game.
This is a danger spot, a location where, if a single Red Cannonball hits, it renders the whole castle and its cannons impossible to capture.
One thing that players cannot afford to ignore is the danger of building cannons too close to the water or the edge of the screen. This is a huge concern. Building cannons close to hard barriers like those greatly reduces the number of pieces that will fit between the gun and the obstacle, and increases the chance that a red cannonball will hit in a such a place as to create an impossible rescue. To the game’s credit, Red Ships do not appear to target these locations intentionally, but neither do they avoid them, so It’s important to try to leave at least two spaces between cannons and any hard barriers, and more if you can. Especially look out for one-space diagonal separation, because it isn’t as obviously dangerous as horizontal or vertical. The more free space around your installations, the easier it’ll be to build walls there later, and the better off you’ll be.
So what if you decide you have enough cannons and don’t want to place some or all this round, do you have to sit and wait out the clock? Why, no: if you make five consecutive illegal cannon placements in a row, the game will take that as a signal that you’re done placing them and end the Cannon phase immediately.
That’s three parts so far! Yes, there’s more to say about this diabolical game, but we’ll take a break for a couple of days, for other posts. See you soon!
Arcade Mermaid is our classic arcade weirdness and obscurity column! Frequently (no promises) we aim to bring you an interesting and odd arcade game to wonder at.
We continue our lengthy, obsessive coverage of Atari Games’ brilliant, but really difficult, arcade strategy game Rampart.
Overview
Building Phase
Rampart is really two separate but related games, the single-player game and multiplayer. Both are excellent. Even so, this article mostly concerns itself with single-player, but towards the end I will have a few things to say about its multiplayer mode.
Before we begin, you should know that Rampart is a highly abstract game, and as such it might not be easy to see how it all fits together from a text description. I have uploadedseveralcompleteplaythroughs of the game to YouTube, the first such on that site of the arcade version. You might watch a bit of one of them, it should make it pretty obvious how the game works.
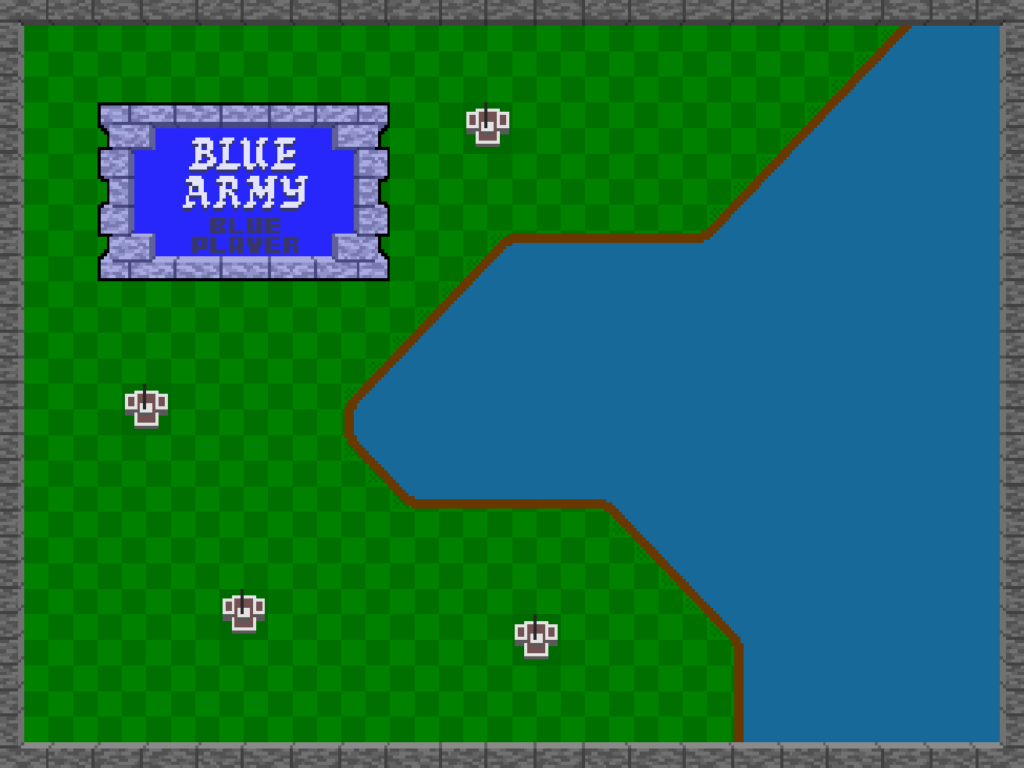
The Board
In both single-player and multiplayer, after selecting a home castle and placing initial cannons, the game repeats a sequence of rounds, each consisting of a Battle phase, Building phase and Cannon phase. In the Battle phase, players shoot at ships or the other players’ walls, while those ships or enemy cannons fire back at their own walls. In the Building phase, players place a variety of shaped pieces in an attempt to fix their wall and/or construct walls around at least one of the castles on their land within a time limit. Then in the Cannon phase, players get a number of new cannons to place within the territory they captured in the Building phase, adding to the number of shots they can get off in Battle.
Select Home Castle, then Cannons -> Battle -> Building -> repeat
This cycle continues until the player wins or loses. Losing happens when a player fails to capture a castle in time in Building. Winning happens, in single-player, when the game decides the ships don’t have a reasonable chance of defeating the player, and advances to the next level, out of six in total. In multiplayer, it happens when all the other players have lost and don’t continue, or for a set number of battles. If the fight goes the full distance, the winner is the surviving player with the highest score.
A defeated player can put more money in the machine to continue the game “with more firepower.” This is allowed four times in single-player, so up to five credits in all, and losing after that results in a solid Game Over. The dynamics of continuing in Rampart are really more complex than this, and I’ll explain those later, but for the time being, you should know “with more firepower” signifies several important changes that are not all clear during play. In multiplayer, losing players can choose to continue individually twice. That can make for a decently long game if all the players choose to buy all their continues. But eventually, the game will declare a round to be the “Final Battle,” after which no continues will be offered to losing players, and the game ends regardless. The number of rounds a game is allowed to go is operator-adjustable, and continued games usually add a few battles to the overall length. There also exists one semi-secret game variation. If just two players play Rampart, and at least one of them is joining in again after a completed game, there is a map selection screen that offers the chance to play a composite game mode, featuring both two players and ships! In this, the ships belong to one or the other side, and are color-coded based on who they belong to. They function like extra cannons, generally firing where the player aims their cursor, but are more autonomous. This mode is an interesting variation, and is fairly obscure. Could there be other such secrets hidden in Rampart’s code?
Basics
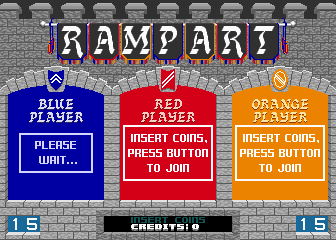
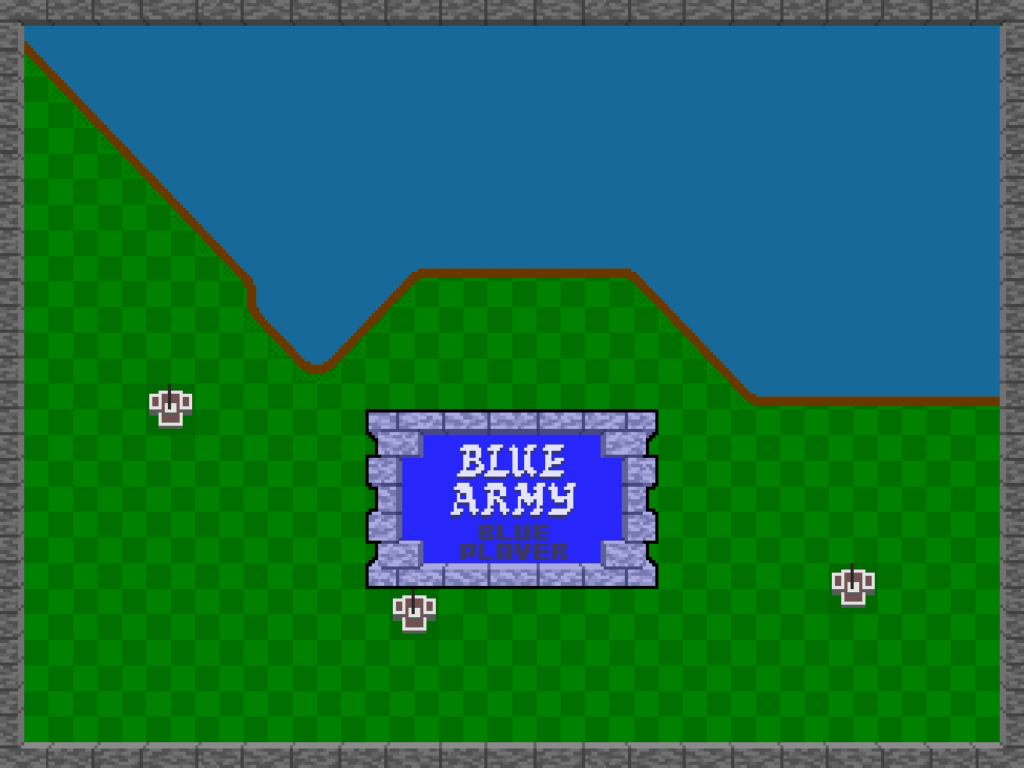
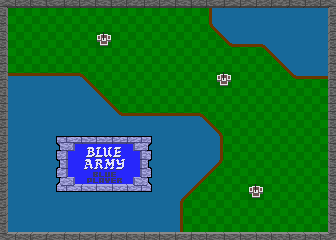
For now, we’re most concerned with figuring out and defeating the very difficult single-player game. The basic play of both games is similar, but there is a lot of difference between attacking ships or walls, and the structure of single-player is quite different, so it’s worth treating each mode separately. When you put a coin in and press Start, this appears:
This ornate lobby screen is accompanied by booming drums and realistic, although synthesized, trumpets and fifes. With the volume turned up (as all Rampart machines should rightfully have) the effect is startling and bound to attract some attention. The purpose of this screen is to give other players the opportunity to join the game, for unlike the Gauntlet-style, “join any time” play model Atari pioneered and most arcade games used, once underway a game of Rampart cannot be entered by others. Players can only leave a game, by failing and not continuing.
An interesting thing about Rampart is that, after a game concludes, it always returns to the lobby screen and adds the player’s score to a total across all their games in the session. This encourages players to play repeated games, to see their overall score climb higher and higher. I’ve seen the total go up to over 900,000 points, which takes around 18 full-length games. I know of no reason to go for a high total score other than vanity, but if someone else has information on this I’d certainly like to know!
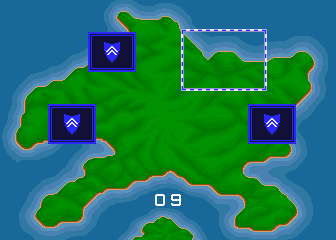
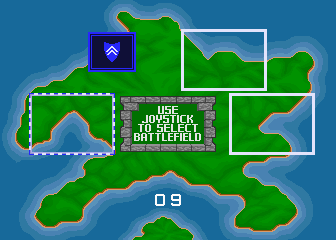
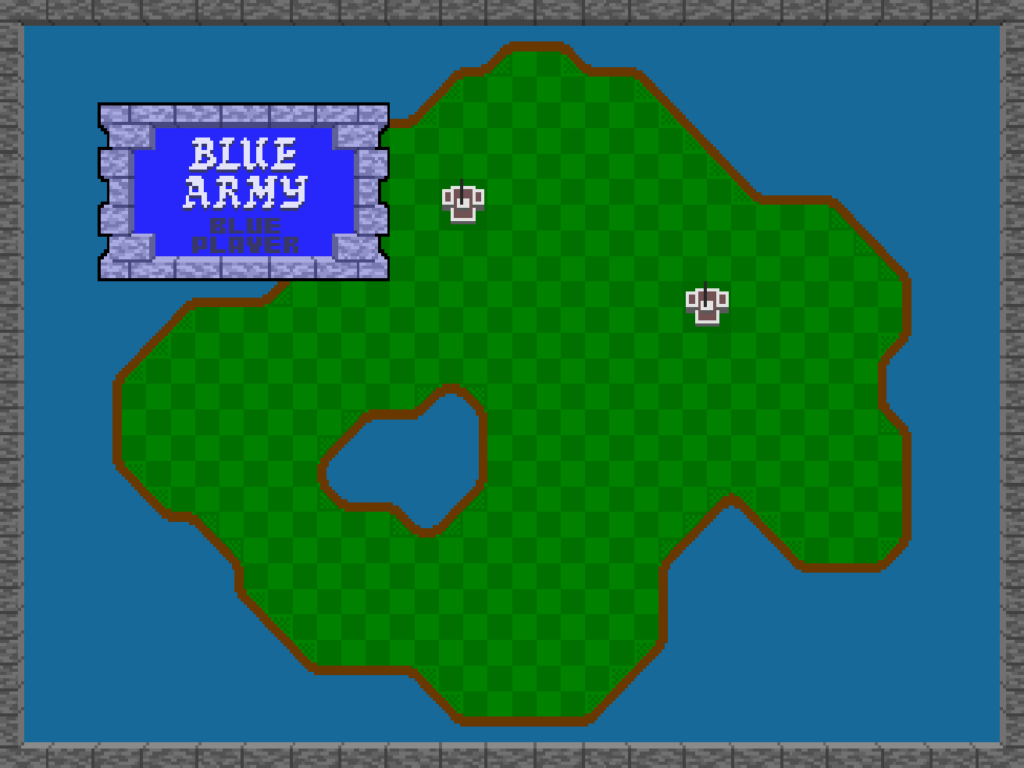
Your Domain
Assuming a single-player game, the screen clears and shows an overview screen of an island. There are four possible maps that can be selected for play here. At the start of the game, two areas along the shore are boxed, one marked “RECRUIT,” the other “VETERAN +5000 points.” Most of Atari Games’ arcade releases had such a selection, for it was a major part of their house style to offer a basic and an advanced difficulty, with a score bonus for starting harder. With Rampart, this choice is mostly an illusion. All choosing Recruit does is start you off with a very easy first board (the Recruit map is always the “J” map), which usually takes two rounds to finish.
Each level pits the player against a larger and more dangerous enemy navy.
At first, only weak Single-Sailed Ships attack, which go down with two hits from basic cannonry. Here, I call these Gunships.
With level two comes Double-Sailed Ships, a.k.a. Landers, which take three hits, and if they manage to get close to a diagonal shoreline, they drop off a swarm of evil little Grunts.
Grunts are a huge danger! They are the only enemy that has the power to move around during the Building phase. I’ll have more to say about them later, but for now just know that a grunt beachhead, left unopposed, has more credit-ending power than anything else in the game.
Starting with level three, Red Ships join the battle. Although few in number at first, these take five shots to sink, and their red cannonballs leave fiery craters where they land. Craters block piece placement and persist for multiple rounds. Usually a Red Ship can get off two or three shots each Battle, and they add up.
Levels four through six feature the same kinds of ships, but they’re darker in color, which in game terms means they take one additional hit before sinking. Dark Gunships take three hits, Dark Landers require four hits, and Dark Red Ships only go down after six cannonballs have struck them.
Every time you complete a level, you’re returned to the island screen to pick a new map to play. After the first level, three remaining unplayed options are offered. If you chose a Recruit game you’ll eventually have to face all these boards, but if you picked Veteran and started on level two, you end up skipping one of them, an opportunity to avoid a disliked map.
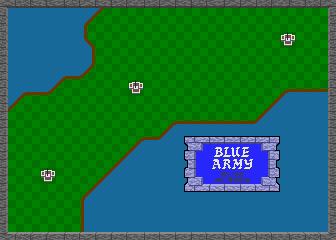
The “C” Map
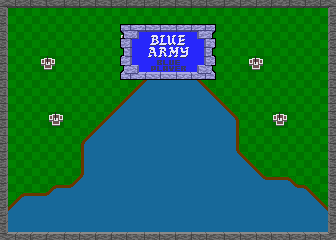
The “Hat” Map
The “J” Map
The “N” Map
The maps are not even in difficulty. Generally, easier maps have castles with land around them on all sides, and more straight horizontal or vertical coastline, giving Landers fewer places to land. My opinion is that the “Hat” map is the easiest, followed by the “J” map, then the “C” and “Lowercase N” maps. A good strategy is to try to get one of the harder two maps out of the way as first selection, so you can later play the J and Hat maps to offset the harshness of the third and fourth levels, but sometimes the Veteran selection level ends up being the Hat, and you’ll have to play them in a different order.
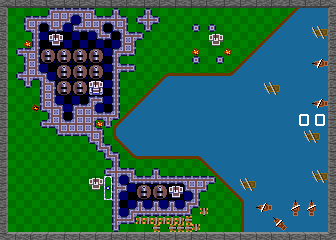
The “Slash” Map
The “Backslash” Map
Level five is selected from one of two unique maps, both peninsulas with water on both sides. Both are difficult, although I think the “Backslash” board is a little easier. As you progress, each level starts you out with fewer castles to capture. By this point you’re only getting three castles, and you’ll probably have to use all of them to survive.
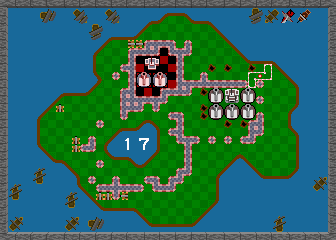
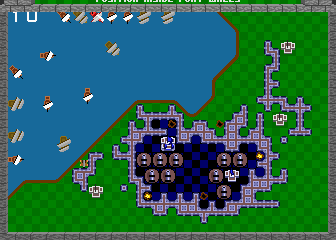
The final, “Island” Map
The last level is an island to itself, with a lake on it and only two castles! Here, ships attack from both sides of the screen. This level is a trial; although you have to sink fewer ships here to win, it’s difficult to prevent landings and grunts from overwhelming you, and the craters from Red Ships can easily give you an inescapable situation unless you mitigate them.
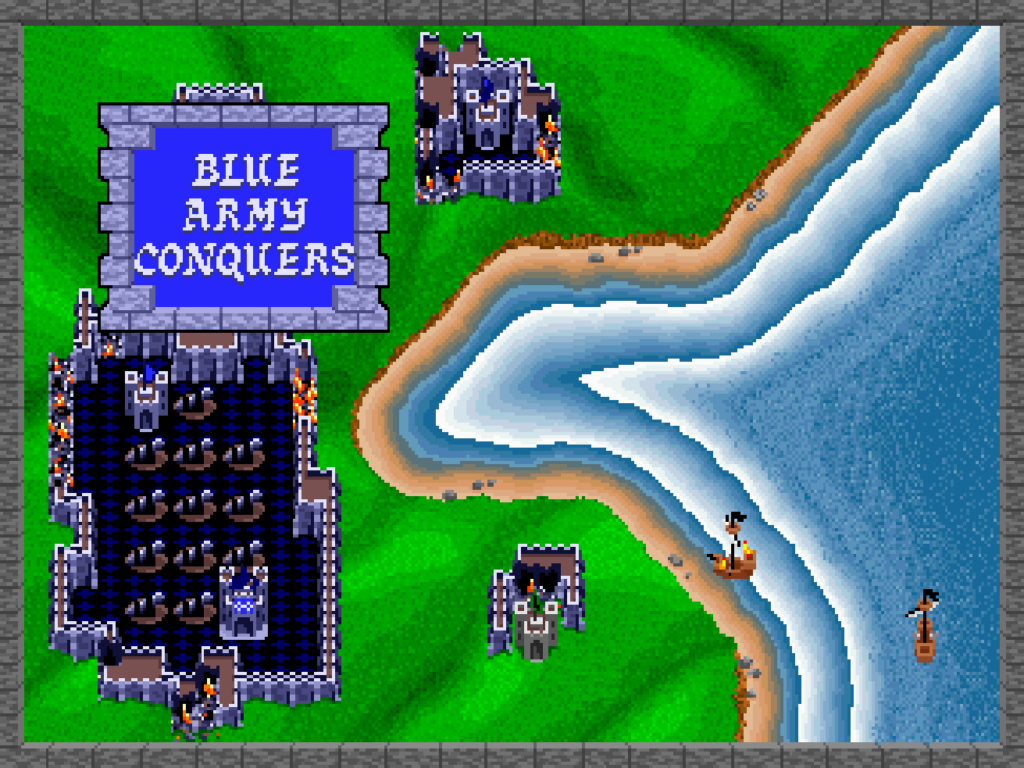
If you finish the last level, you get special ending music, and an illustration that few arcade goers have seen, before being returned to the High Score and Lobby screens. It may seem anti-climatic, but final victory and safe shores are their own reward.
Arcade Mermaid is our classic arcade weirdness and obscurity column! Frequently (no promises) we aim to bring you an interesting and odd arcade game to wonder at.
The next week is going to be pretty busy for me, so I’m reusing a long long piece I originally wrote for the short-lived fanzine I made, Extended Play. It’s been seen before, but only by a very small audience.
Rampart has been an obsession to me since it came out around 1990. I still think it’s one of the finest arcade games ever made, actually one of the best video games period. People tend to describe it as either an early version of Tower Defense, or Missile Command meets Tetris, but neither description is very good. Simply, there had never been a game like Rampart before, and despite some attempts to clone it, there’s never been a game like it since, either.
We’re all as obsessed with weird old arcade games as I am, right? Right?? Most (but not all) of the next week of posts will all be about this wonderful, but extremely difficult, game, one of the best from Atari Games at their heights. Please bear with me, and please, try to understand why I’ve been so into this unique game for so long.
In the late 80s Atari Games was recovering from 1983’s Great Game Crash, which decimated the US arcade industry and resulted in a great dying out of companies. Atari Games, newly split away from the consumer electronics company that would make the Atari ST, weathered it better than most, primarily through developing ingenious kinds of games the likes of which were seen nowhere else.
This period, 1984-1990, is the age that began with Marble Madness and the System 1 hardware, followed by hits like Paperboy, 720 Degrees, Gauntlet, Toobin’, Cyberball and others. It lasted roughly to the release of Street Fighter II, which sparked the fighting game craze and made arcades inhospitable to most other genres for a while. At the tail end of this period came Rampart, designed by John Salwitz and Dave Ralston, who also created three of the games in the foregoing list.
It’s a bit obscure now, but it was quite a hit for Atari at the time. For home systems Rampart received no less than thirteen distinct ports, plus a few notable emulations. It got very good reviews from Nintendo Power (SNES version) and Videogames & Computer Entertainment (arcade). More recently, it was released emulated with network play for free for the PlayStation 3. And yet, still, no one talks about Rampart anymore.
Battle Phase
That is a weird thing about what I call Atari Games’ “Silver Age,” that time after the classic arcade boom of the late 70s/early 80s but before the rise of one-on-one fighting games, its games, while still fun and surprisingly ingenious, and widely ported, don’t have the star power, other than a couple of things like Gauntlet, that Japanese releases from the same time have garnered.
Part of the reason may be trademark-related. The name Atari still carries considerable nostalgic weight, but another company, the one formerly known as Infogrammes, bought the trademark and the classic Fuji logo, and still releases games under it. They own the rights to everything before Marble Madness. Games after that were owned by Midway for a while, but Midway then, in a crushing indignity, renamed them Midway Games West, before closing them outright in 2005, getting out of arcades altogether. Many of its assets were sold to Warner Bros. Entertainment, who presumably now owns the rights to Atari’s post-Marble Madness catalog.
I’ve written before that, at their peak, I think Atari Games was more ingenious and original than Nintendo themselves. They made some stinkers, sure (few remember Thunderjaws, or their arcade take on Tim Burton’s Batman movie) but their best games were, and still are, amazing. I think that Rampart, while little talked about now, is at the top of the gilded heap.
Rampart is great, but it’s difficult. For a game I’ve been obsessed with since its release in arcades in 1989, I can only complete it on default settings about a third of the time, and usually only after expending all the continues the game allows. This was common for Atari Games games, who tended to make arcade machines that mocked the idea of one credit runs, but even among those, Rampart is hard. You are not going to master this one overnight.
I view my purpose here usually to be a secondary source. That is, I prefer to summarize, encapsulate, explain and preserve information available elsewhere. But the thing about Rampart is, there is very little of this information to find. For a game that was popular at the time of its release and with so many ports, googling it will not turn up much to aid you. As far as I know, and I’ve searched for it many times throughout the years, Rampart has never had a good, comprehensive strategy guide written for it.
It is because of this, favored reader, that I have decided that this shall be that guide. Since most of it is self-discovered, I have no one to blame for errors but myself. I have made some efforts to make sure it’s correct, but, well, sometimes even well-considered assumptions turn out to be false. I’ve done what I can.
One of the essences of comedy and humor is a shared context between participants. When a joke is made both the teller and the hearer must know what’s being spoken of, and how the elements fit together in relation to each other, if the funny ha-ha is to occur.
Which is why I find the creation of The MAD Computer Program interesting. Published on issue 258 in BASIC for four of the microcomputer platforms of the time, Atari 8-bit, Apple II, Commodore 64 and IBM PC, it was obviously MAD’s bid to maintain technically relevant to that brief moment in computing history. Setting aside whether it’s actually funny or not (it’s not), it means that MAD’s editors must have decided that home computers were common enough that they could waste some of their precious print pages on catering to their owners. Anyone without one of those computers would find them to be four pages of wasted content.
The four programs have a lead-in that reads in a set of data (using READ commands to get vector coordinates from DATA statements, of course). The lead-in part is different for each platform, but the lines with the DATA statements are the same, and so are only printed once in the magazine. That’s also the least interesting part of the ordeal of entering type-in programs: tables of raw data, numbers without context, sequences of values that will put your monkey brain to sleep, yet will surely cause your code to fail catastrophically if entered incorrectly. There’s 140 lines of them to enter here, plus some more if you’re using a C64. As my eyes brush over them, childhood trauma from entering type-ins from computer magazines cause them to water involuntarily. I miss the age of magazine-supplied type-in programs, but not that part of it.
What do you get when you spend a grueling half-hour typing in two pages of numbers written by a group who describes themselves as a gang of idiots? Something genuine useful like Compute’s Speedscript word processor? A unique and interesting two-player game like Basketball Sam & Ed or Laser Chess? The author of the text of the piece is coy about what the result will be, but encourages readers to send a printout to the MAD offices. I wonder how many did? Probably not too many; a thread on the AtariAge forums implies that there’s an error in the listing that causes the program to crash about two-thirds the way into its run. One participant remembers that MAD published a correction a few issues later, but if they actually did I can’t say.
If someone does get it to work, what then? If you’re familiar with MAD you might can already guess what the result, a picture drawn in hi-res on your screen, will be, but to save you the effort of setting up an emulator and entering over a thousand numbers one at a time, here’s a Youtube video of the program in action:
The preview gives it away. WHAT, ME WORRY? It’s a pretty good representation!
The video links to the blog post on Meatfigher.net that I learned about the program from. Meatfighter’s a pretty cool little blog and it’s worth rummaging through their archives! atariprojects.org offers an emulator disk image with the program already entered for you. dougx.net offers a version of the program written in Javascript that renders its output in your browser window. Without the (relatively) low resolution of the ancient computers that ran the original programs I feel the result loses something, but at least you don’t have to type it in yourself.