

Arcade Mermaid is our classic arcade weirdness and obscurity column! Frequently (no promises) we aim to bring you an interesting and odd arcade game to wonder at.
Yes! More Rampart! I’m still out of town at DragonCon so I’m repurposing an old strategy guide I wrote for Extended Play into a week of posts. Even I’m starting to get sick of Rampart by now, but please stick around. And if you’ve ever tried playing this infuriating game in the arcade, this might give you the advice you need to get through to levels you might not have thought possible! And this is even a fairly short post!
Level Strategies
Level One (“Recruit”)
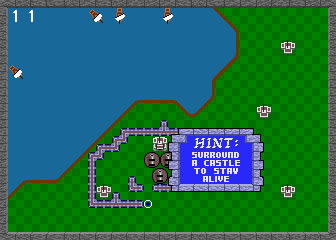
Castles available: 6
It’s advised not to start on this level unless it’s your first game. You’ll not only miss out of 5,000 points by starting here, but it means the beginning of Level 2 will begin you with only two cannons instead of three, and you’ll face more ships.
This level is so easy that it barely rates mention. It has six castles, and only Gunships appear. Unless you’re purposely stalling, you’ll finish this map in two rounds. Even if you stall, the level auto-completes in three rounds, regardless of if you fire a single shot.
Another reason to avoid picking Beginner is that its selection is always the “J” map, which is one of the easier selections from the initial four boards. It’s better if you pick it later, when the opposition is harder, to balance out the difficulty.
Level Two (“Veteran”)
Castles available: 5
The Veteran level is randomly chosen from one of the other three basic maps, although it tends to be the “C” map most often. Ideally it won’t be the “Hat” map, it being the easiest, as you’ll want it to be your Level 4.
If you started on the board, the first round will always put you up against four ships, one of which may be a Lander. Later ships are frequently also Landers. As a result grunts may appear on this board, but even if some appear, so long as you focus on destroying enemy ships and don’t suffer major setbacks like losing your home castle, you’ll probably wipe out the attackers before they become a huge problem.
On a later round in this level you’ll probably encounter your first Red Ship. A Red Ship tends to get off two or three shots in a round, each producing flaming crater you must build around.
Level Three
Castles available: 5
You always get to pick this level yourself. I usually try to make it “C,” “J” or “Hat,” in that order. I usually avoid picking “N,” but it’s not really harder than “C,” so pick whatever is your preference.
Much of the fleet will be Landers here, so this is the first level where you must be diligent about thinning out their numbers. Especially try to take care of ships about to land; grunts are unwelcome visitors to deal with, and it’s best if they never show up at all. In the event of a landin, which is sometimes unavoidable, try to spare a few seconds to build a barrier to them, to wall them off from the rest of the board. If you can contain them in a small area around the landing, you can keep their numbers down that way and thus reduce the number of shots you must expend in cleaning them up. Don’t think you can just let them be! They will overwhelm you easily if you ignore them.
I try to pick a home castle that’s near another castle, so I can capture them both with one wall. If you can consistently get both each round, that’s three cannons each time. Use them to connect the space between the two castles, but try to keep that space as small as possible. Try to aim for the minimum-sized rectangle needed to save both of them, and then try to place all your cannons within that rectangle.
Level Four
Castles available: 4
Now the game starts to get serious. If you can get here on your first credit you’ve done very well, but your weak basic guns will become more and more of a liability for you. Dark ships start appearing on this level, and will continue to appear until the end of the game. They all take one extra hit to sink. That’s three hits for Gunships, four for Landers, and six for Red Ships.
Try to make Landers that have a chance of landing at a diagonal shore your top priority. If one makes it through, then at the start of the Building phase devote three seconds or so it blocking their progress with walls. If they get away from the shore and a significant number appear, then focus on surviving and shoot them with cannons during Battle. Red Ships start to be a significant threat here. Once all the potential landings are taken care of, try to pump six shots into a Red Ship.
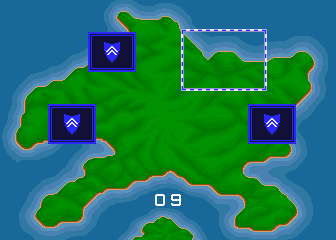
Level Five (peninsula)
Castles available: 3
Regardless of how you got here, you have a choice between two new maps for this level, a diagonal peninsula going upper-right to lower-left, or one going from upper-left to lower-right. I call these the “slash” and “backslash” maps, respectively. I usually pick backslash, but both are about the same difficulty.
These maps have the property of having two seas, a small one at the top of the screen and a more typical larger one at the bottom. The small water region is both a blessing and a curse; the restricted movement makes it easier to destroy ships there, but landings are very likely unless you clear out the Landers arriving there. What is more, these maps are the only ones in the game that break the rule about landings only being possible on diagonal shores. Landers in the small sea are also counted as landed if they contact land at the very edge of the screen, even if there’s no diagonal shore nearby. This property doesn’t extend to screen-edge landings in the larger sea.
The worst thing about these levels is that the game takes off the limiter on the number of Red Ships that can be generated each round. Red Ships here are nearly as common as Double-Sailed ones! You’ll frequently see seven or more on-screen at a time. While you must remain vigilant to prevent and/or mitigate landings, you must also work towards reducing the number of Red Ships. The large number of flaming craters on these levels made adopting a “summer home” strategy imperative, where you switch off between castles when one gets too difficult, or even impossible, to save. It’s usually a good idea to try to capture two castles in the first round because of this; then you can station some or all of your cannons for that round at the other castle, so you’re not defenseless when you’re forced to turn to it for survival. From there, you can focus on getting cannons around the third castle for maximum safety.
This level is a strong test of your Rampart skills, and often is a barrier to progression until you’ve played many games. But it’s not invincible. On Easy difficulty, I’ve passed this level still on my first credit multiple times. The biggest thing you have to worry about is the high probability of impossible situations.
Consider: when any castle is adjacent to other objects, you must capture the whole collection as a set. Chains of objects like this increase the difficulty of getting the whole thing, and increases the odds of getting an impossible save. I’ve seen this happen after even the first round on a peninsula board, and I’ve seen it happen on all three castles on one of these maps at the same time.
The only substantive thing you can do, besides rotating between castles, is to shoot some of the dangerous walls yourself. Red Cannonballs don’t leave craters if the wall is already destroyed, but that takes time and often makes for a difficult repair.
So, what if you manage to clear this map? What happens next? The game scrolls the FINAL BATTLE banner, and you get a one-way ticket to:
Level Six (island)
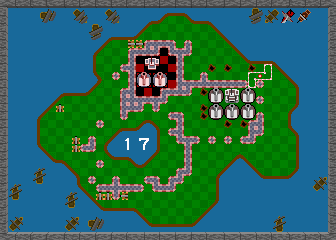
Castles available: 2
It all comes down to this. This level is a special kind of hell, only slightly mitigated by the fact that it seems you can get away with sinking fewer ships here, and, because you’re surrounded on all sides, your shots often don’t have that far to travel to reach a ship. There are four prime landing areas, each in one corner of the map, so landings can only be delayed, not prevented. And you only get two castles. Enjoy!
When you start looking more closely at the map, some slight advantages become apparent. There’s a lake in the bottom-left of the board, which gets in the way, somewhat, of grunts approaching from the bottom. Both castles have a good amount of land around them, although there are so many Red Ships here that the “summer home” strategy is essential to survival.
The continue limit eases up a little bit here. If you were at the maximum of four continues upon starting Level Six, the game will grant you an extra continue when you get here. (You still have to pay your coins for it though.) And also, if you were at that final credit, the game will actually downgrade your cannons one step when you get here, so get used to expending two/three/five shots for Gunships/Landers/Red Ships again. If (ha ha, “if”) you do expend that last continue, you go back to only needing one/two/four shots to sink ships. (There is more information on the effects of continues on cannon power in the notes, later on.)
This level is an ordeal, but it can be finished surprisingly quickly. I’ve seen it cleared in three rounds, although that was after several continues (it had been a pretty great game up to that point). This level is the big obstacle to one-credit clears, I’ve managed to finish everything up to it on one credit only to bang my head against it repeatedly. Using save states, I’ve managed to finish it with a single continue, so it is possible to finish it relatively cheaply, but making do with such weak cannons is a real challenge.