Let’s jump right to the subject. A “Jagen” is a type of character in Fire Emblem games, named after a character from the very first game. Here is ActualLizard’s video on the subject (19 minutes), which has a lot of interesting things to say about strategy.
Jagens are characters, often given to you in the early game, sometimes available even from the very first battle. They have high stats for the early game, and are often already promoted, of the advanced classes that your other troops will have to use a special item to obtain. Jagens often have little to fear from the enemy hordes, at least in the early game.
Jagens are very useful characters, but are kind of a trap. They’re already promoted so they get few experience points from battling lesser foes, and when they do gain a level, they tend to have very low growth rates in their stats. If you over-rely on Jagens, your other characters will be underleveled, and eventually a Jagen’s slow stat gains will cause it to be unable to keep up with the increasing power of the enemies in the advanced levels. That doesn’t mean they shouldn’t be used at all, but they’re best purpose is to take the edge off of the difficulty curve and supporting your other troops. Since the original Jagen was a mentor figure to Marth and his allies, it’s an excellent case of the game’s story mirroring its design: Jagen’s days of glory are past, his true purpose to help shield and guide the next generation into becoming the best fighters they can be.But! Each game is different, and not all early game powerhouses neatly fit into the Jagen archtype. Some such characters don’t actually stay competitive for long at all, while others (like the awesome Titania in Path of Radiance ) have a strong chance of being useful for the entire game.
You should know a few things about how Fire Emblem’s character growth works. Every character has a number of stats: HP, Strength, Speed, Defense, things like that. The Fire Emblem series is defined, in terms of combat design, by its slow character growth. Every time a character gains an experience level, it only has a chance of gaining a single point in each stat. This chance is preset for each character, and gives everyone a tendency towards certain destination stats, an average spread throughout its 40 potential experience levels. What its actual stats will become will be different each game, depending on what that character rolls upon growth. While many characters have a chance of really great stats, whether they’ll achieve them differs on every playthrough. Growth rates affect that likelihood.
Fire Emblem games tend to put characters right on the edge of survival. When you go up against a boss, you may only have a handful of characters who are capable of denting its high armor, or surviving its counterattack. (Remember, in classic Fire Emblem, is a character dies, it’s gone permanently. If you want to keep using the character, you’ll have to go back to the save before the battle!) This makes it possible to get into situations where all of your characters, even if they’re of decent level, aren’t strong enough to safely defeat a boss.
Characters who join at a high level, or pre-promoted, are a solution to this. The story will sometimes hand you a new recruit to help you keep going, in the event that your party’s been betrayed by the RNG. Whether you should keep using them is something that only experience (and multiple playthoughs, or, let’s be honest, FAQs and walkthroughs) will tell you.
WARNING: This isn’t a Youtube video! It’s good old text, like Frog intended the internet to be!
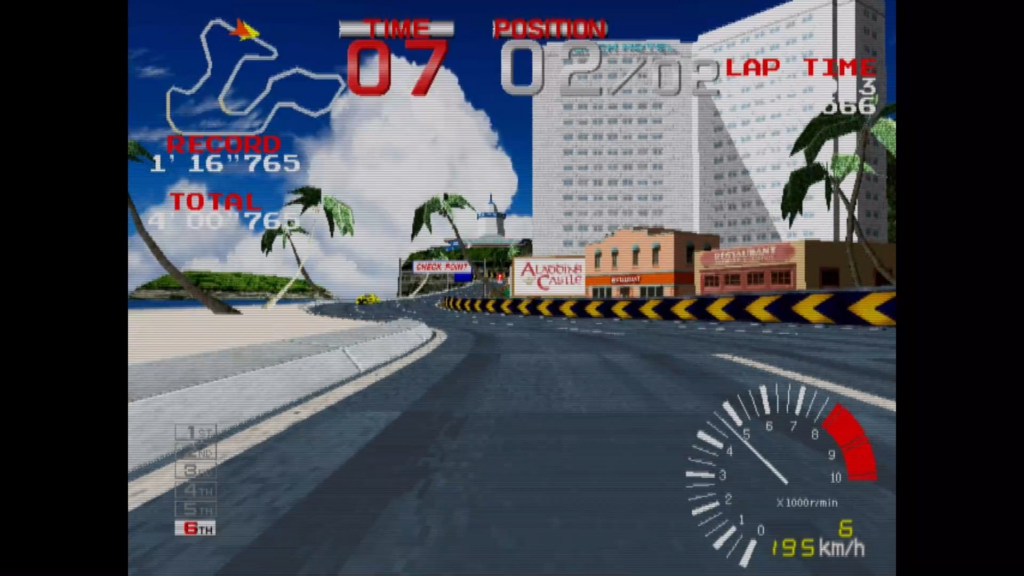
Over on The Gamesoft Fun Club, David Cabrera explains how great arcade Ridge Racer is, that isn’t exactly like the Playstation version, in fact it runs on more powerful hardware. And he’s played so much of it, including on the recent Arcade Archives release, that he has one of the top 50 times in the world on it. He’s so enthusiastic about it that I think it may nearly rival my own obsession with arcade Rampart, although that’d be quite a lot of unhealthy focus indeed.
Image from the linked article.
Mind you, arcade Ridge Racer only has one course, although according to David it plays quite differently depending on your difficulty. There’s an extra section that opens up at the higher levels, and the course is designed so that higher speeds requires more skill to make it through without crashing.
It’s not really a long article so go give it a read? It’s the kind of thing that makes the web great.
Jamey Pittman is the creator of the foremost document on the workings of Pac-Man ever created, the Pac-Man Dossier. If you’ve never read it, but have any interest in playing classic Pac-Man, then you should go read it immediately. It will make so many things make sense to you.
Pac-Man has a reputation as a game of patterns, and seems designed in such a way as to enable patterns to work. The only randomness is in the behavior of the ghosts when they’re vulnerable, and even then, if the player has performed the same moves at the same times up to that point in the level, even their vulnerable behavior will be consistent. Its GCC-developed follow-up, Ms. Pac-Man, has the red and pink ghosts move randomly at the start of each board specifically to foil patterns.
But you don’t have to play Pac-Man as a pattern game. It is possible to play it “freestyle,” like a naive player would, reacting to the ghosts’ movements. You’re unlikely to make it to Pac-Man’s famous kill screen at board 256 that way, but you can still make it pretty far.
Key to doing that is keeping the ghosts as close to each other as you can. The ghosts are much more dangerous when they’re scattered around you, because they can block off all of your escape routes. Four ghosts piled up on the same spot not only can’t block off other corridors, but their AIs tend to continue to keep them together, at least when they’re far away from Pac-Man. Red and Orange behave identically when they’re at a distance, and Pink’s behavior appear to be more like Red’s the further away from Pac-Man it us. Blue has the most chance of diverging, but often moves the same way anyway.
Not only does keeping the ghosts clustered make survival easier, but it makes it much easier to eat all of them with a single Energizer. The ghosts only turn blue up to around the 4/6th Key board, but up to that point it’s basically impossible to get the maximum score from every Energizer if one hasn’t managed to herd the ghosts into a single, easy-to-gobble blob.
That’s where Jamey’s tutorial comes through. It presents a series of situations and techniques for getting the ghosts near each other and moving as one unit, whether it’s for avoiding them or getting the maximum points from an Energizer. It’s a bit much for casual play, but it can be very interesting to see how a true expert goes about doing it. Here, then, is the tutorial (27 minutes):
Acronyms: KAR: Kirby Air Ride, the original for Gamecube. KARs: Kirby Air Riders, the new game for Switch 2. (Note the following lowercase ‘s’.)
Who’d have thought that a Kirby game could be so vicious? If you think Smash Bros is a fun and lighthearted romp then this game will show you how perilous a Sakurai game can be. Several of the characters, even among the limited selection in the demo, are former bosses (King Dedede, Meta Knight, Magalor, Susie), so you might think of this game as them taking out their frustrations on Kirby for beating them up.
I should say that the demo was missing many items and events, this only covers elements from the Global Test Ride demo, available here. The first Global Test Ride is over, but there is another one on November the 15-16th, depending on your timezone. The full version of Kirby Air Riders is out on the 20th.
While it allowed playing Air Ride, the namesake mode, in an offline capacity, the demo focuses on City Trial, the mode everyone remembers from the original KAR. The game comes with a bunch of tutorials, and they can be played even outside of the demo period. They explain the basics adequately, so other than a bit of a recap I’ll content myself with explaining City Trial in more detail.
If you’d like to see what it was like during play, I recorded some of my adventures playing the demo and uploaded it to Youtube, here (1 hour, 22 minutes):
How it works
You and up to 15 other people are thrown onto a big sandbox map, a city on Kirby’s home planet of Pop Star called Skyah. In the demo, in practice, you’ll be playing with 15 others; I never had a match with fewer than that.
You all start out riding Compact Stars, which are maneuverable and can glide a bit, but are really fragile and have little else to recommend them.
Rapidly move the control stick from one side to the other to do a “Quick Spin.” This is an essential move! While you can damage other machines just by driving into them at a sufficent speed, Quick Spins make it easier to do damage, and you even get a brief period of invulnerability at the start of a spin.
You have five minutes to pick up “patches,” single-color icons that increase your stats a bit in one of a number of categories. Get as many as you can!
There are different colors of boxes that appear. Blue boxes are the most important, as they contain both patches and food items that can repair damage. Red boxes contain Copy Essences that give you different attacks; Green boxes have other kinds of items. Only the patches are permanent. Break boxes by either boosting into them repeatedly or using the “quick spin” move.
You can also change vehicles. Ride up to an empty vehicle and hold down the Y button (sometimes called “Special” in the game) to switch to it. You take all of your patches with you when you do this!
While you can get off your vehicle by holding Y for a while, there is little reason to do so. You can’t even pick up power-ups while unmounted.
You can attack other players. So, too, can they attack you, and as mentioned at the start 16-player City Trial can be incredibly vicious. Stay on your guard. Players who are attacked usually lose a patch or two. If your vehicle gets destroyed, you’ll lose a bunch of patches, although not as many as in the original KAR, where you usually lost half of your patches. By the way, when I say you’ve “died,” I really mean your vehicle got destroyed. Your character cannot be harmed.
The city is pretty big, and has several hidden areas. Generally, the more out-of-the-way areas are safer, and have more powerups to collect.
Throughout the time period, different random events can occur. Some good, some bad, and some are just weird. If the event has some special location, an arrow will often appear around you pointing which direction it’s in.
One kind of event is the competition event, and it’s like a minigame. You’re told a “quick race” or a “dustup derby” is about to begin, with a start location somewhere in the city. It’s up to you if you want to participate, but if you do you’ll get at least eight random patches for participating, a few more if you arrive early, and you’ll get some more if you place well. Even if your vehicle gets destroyed in the event, it isn’t permanent. If you choose not to participate you can continue to explore the city, and without the participants attacking you might come out ahead. It’s your choice.
The purpose of all of this comes after time runs out. You’ll be given a selection of one of four “stadiums” to participate in using the machine and all the patches you’ve collected. The stadiums are all very different from each other: there are races of several types, battles, combat against enemies, button-pressing competitions, jumping contests, and even boss fights. At least one will be recommended to you based upon which machine you’re riding. Think carefully: some machines are unsuited to some stadiums. If your machine is really unsuited (a wheeled vehicle in an aerial stadium), the game will even stop you and ask if you’re sure, but it’ll let you do if anyway if you tell it yes.
This bit is important. Each stadium is its own game: you’re playing to win your stadium, not the City Trial session. Due to this a large game of City Trial can have up to four first-place finishers. If a lot of players (more than eight) pick a stadium, it’ll be split off into two separate competitions with their own winners. If you’re the only person to pick a given stadium, you win it automatically.
The finer points
Machine choice You start out with the Compact Star, which is extremely fragile. I don’t know if this is still true, but in KAR it was found to have zero defense, meaning Defense patches had no effect on it!
You’ll want to switch to another machine, scattered around the city, as soon as possible, before some of the players will pick up the stronger machines. Shadow Star is prone to being taken out in one hit, with the main compensation that the rider can do the same to other vehicles. Also, Wing Star has always been notoriously killable, and Paper Star is even more frail. All of the flight-focused machines are made of paper, figuratively or literally.
The sturdiest machines are Rex Wheelie, Bulk Star, Wagon Star, Battle Chariot and Tank. Especially Wagon Star, whose health bar can extend up and off the screen.
You can choose your character too, and that can have a substantial effect on your longevity. Throughout all the vehicles and characters there’s a general theme of lighter: easier to get killed and fly, and heavier: does more damage and sticks more to the ground.
Evasive maneuvers Driving in a straight line is pretty dangerous. In fact with people riding Battle Chariots and Tanks roaming around almost anything you do can be lethal to your machine, but driving in a straight line out in the open pretty much paints a big bullseye on your back. The more fragile your machine, the more important it is to avoid open spaces and driving in obvious straight lines.
Try not to brake for too long, or drive into walls. This might seem obvious, but there are players that look for people driving into barriers.
Awareness Despite all these things, you’re gonna die sometimes. Somethings that could help: look for icons at the bottom of the screen indicating pursuers. And be aware of a red border along a side of the screen: that means there’s a big danger nearby, like a bomb explosion or a Gordo.
Machine advice If you decide to go with a flying machine, all I can suggest is being very careful. Most of them can’t take more than one or two hits. If you go with one, you’ll want to spend most of your time in the air, where it’s much easier to survive, and get your stats from the tops of buildings and flying through rings
The most important stat, as with the original, is Top Speed. Not only is it generally useful in most stadiums, but the faster you move, the quicker you can get to patches, and the faster you can grow your machine.
Unlike in Kirby Air Ride however, depending on your choice of character you might have low acceleration, a.k.a. Boost. And all drivers that have high Top Speed have low Boost, and vice versa. If you’re playing a high Top Speed character, Boost may be a higher priority for you. At least one machine, the Bulk Star, can’t move at all unless you charge it up, so the Charge patches will be more important to you.
Places – Underground mall No place is completely safe, but the underground areas tend to have a better ratio of reward to risk. The mall is tight corridors and little room to avoid conflict, but also more boxes than other places. – Crystal Caverns The crystals here can be destroyed, and contain patches. They tend to get cleared out early in each match, but it’s pretty common for one or two to be missed if you find yourself here anyway. – Shipwreck The lift pad in inside puts you on deck, where you can use the cannons to immediately become airborne – Plaza This central location has ramps for getting into the air – Rails Like the original, there’s a system of rails that goes around the outside perimeter of the city. KAR enthusiasts tend to call these “rail jail,” since getting on them tends to mean you’re stuck for a few oh-so-important seconds. Now the rails sometimes have a patch on them, and you can escape a rail by holding to the side for a second or two. Be careful now to fall off on the wrong side though. – The Volcano During the Portal event you can sometimes find a lunar landscape, which is actually beneath the Volcano! The lift pad inside it sends you way up high in the air. Is there another way into the Volcano? I’m not telling! Because, honestly, I don’t know. Sakurai says there is, but that could just be via the portals.
Events – Meteors & Gordos Both involve huge round dangerous things falling from the sky. You don’t have much vertical range of vision, so it’s difficult to avoid them while you’re out on the surface. It might be a good idea to hide underground during these events. – Bosses (Dynablade, Grand Wheelie, Kracko) Fighting the bosses is dangerous, but can be a good source of patches. As with any event that attracts lots of players to one spot, you might actually get more benefit from attacking the distracted players than the boss. – Lots of Boxes They all appear in one location. Again, attacking the gathered players feeding at the trough works well here. – Portals The game hurries you into them, but they just lead to other places in the city. As explained before though, one of them leads to the lunar chamber beneath the Volcano. – Competition events It’s usually a good idea to participate in the competition events even if you don’t have a good vehicle or character for it. There are two kinds: Races and “Dustup Derby” bouts that are kind of like vehicular deathmatch. Even if you lose, your state is restored afterward, and you get at least eight random patches, risk-free, just for participating. – Secret rooms There’s a few secret rooms in the city that are usually locked off, and only open for this event. When they open, each has several of the same powerup in it. Sometimes they’re patches, but sometimes they’re just attack items. Unlike KAR, there’s more than one secret room in the city this time. The arrow around you points to the nearest one that still has powerups in it. – UFO One of the few upsides of aerial machines is being able to get up on the flying saucer when it occasionally visits. There’s a lot of patches up there, often including an All patch, which increases all your stats by one point. – Rare boxes, and Rare boxes with fakes Rare boxes have lots of patches and few downsides. Rare boxes with fakes, though, are infuriating; opening the wrong box will inflict a lot of damage on you, and has a good chance of destroying your machine outright. If it follows a similar philosophy as KAR then there’s some way to tell them apart, but in the hectic atmosphere of the demo period I didn’t have a chance to figure out what it was. – Treasure chests Search the city for a key, then take it to a treasure chest for a prize. The arrow around your vehicle points the way, although the two times I spotted this rare event I wasn’t able to get anywhere near one of the keys. – Tiny players! Gigantic items! All the boxes contain the same items! All machines fly more easily! Some of the events are just strange happenings. At least the worst events from KAR, dense fog, fake items and bouncing items, don’t seem to occur here, or they don’t in the demo.
Priorities – In the original, Top Speed was the undisputed king of powerups. Higher Top Speed means you can explore and find more patches faster, and most of the stadiums prioritize speed. Two things challenge Top Speed’s domimance. Bigger characters and vehicles tend to already have a good speed, but are slow to reach it; for them, Boost (acceleration) might be a greater priority. Second designer Masahiro Sakurai said in KARs’s first Nintendo Direct stated that Top Speed actually reduces your Defense a bit, which as far as I’m aware is new. Now Top Speed, while still very important, is a bit more of a tradeoff. Rider/vehicle combos with lower acceleration will want to get more Boost (which should properly be called Acceleration). Weight increases speed a little and makes you a bit more durable. Flight patches on a wheeled vehicle are practically worthless, and Flight lowers durability a bit too. Look out for the gray patches though, those are powerdowns. – The best Copy Abilities are Needle and Sword. Both are excellent for attacking bosses. Plasma is also pretty good, and easier to use than in KAR. – There are also special weapons and powerups. One of them, the Firecracker, has gotten a severe downgrade since KAR, it’s only got ten automatic shots now instead of the original’s 25 and so is useless if there isn’t a target in sight right away. That’s a common issuen with the powerups, but it’s especially bad with the Firecrackers.
Stadiums Oval Course: A race around a simple course. In KAR, all of the Air Ride courses got used as stadiums, but there’s been no hint that this will happen in the new City Trial.
Drag Race: A quick trip down a straight course. While races are a bit more competitive in KARs than they were in KAR because of the new trail-of-stars catchup drafting mechanic, this still usually comes down to whoever has the best speed stat.
Beam Gauntlet: The event doesn’t mention the fact that this is a race, but through a treacherous obstacle course. If your machine gets destroyed along the way, you end up in last place.
Gourmet Race: While called a “race,” the players are actually trying to collect as many food points as they can. The winner, I think, is usually the one who knows how to get extra food on top of the buildings, instead of grubbing the ground grub with the other players stuck down there.
Target Flight: A good event for upsets, if your vehicle has enough airtime to make it to the target board you might earn up to 100 points. This event gives you two tries to get the best total score.
Skydive: Also prone to upsets, this is my favorite of the new stadiums. Use the boost button to plummet down through the target rings, and find the highest-value landing place you can. You get a time bonus for finishing quickly, so even if you somehow end up here with a non-flying vehicle, you can get a good basic score by just plummeting down as fast as you can.
High Jump: Use a ramp to jump as high as you can. This one is mostly a stat check: how good is your flying power?
Air Glider: Use a ramp to jump as far as you can. While also a stat check in essence, at least in this one you have to strike a balance between forward speed and height.
Dustup Derby: a version of the “deathmatch” event from the city. If your machine gets destroyed you get another one, letting you stay in the game (but also letting the other players kill you again for another point).
Kirby Melee: the players are put in an arena with a cloud of basic enemies, many with copy abilities, and compete to defeat as many as they can. I found the Needle copy power to be very helpful here, if you can snatch up an enemy that has it.
Vs. Boss: A co-op event where all the players work together to defeat a bit enemy. The only boss in the demo is Robo Dedede. If you don’t work hard at attacking it you won’t win, although the players get ranked either win or lose. Quick Spins won’t cut it: you’ll need to use the powerups that appear in the arena to have even a slight chance.
There was also stadium where you tried to change more buttons to your color than the other players, and another battle event where there are powerups that make you huge and extra powerful. I’m pretty sure there will be more events in the full game than featured in the demo.
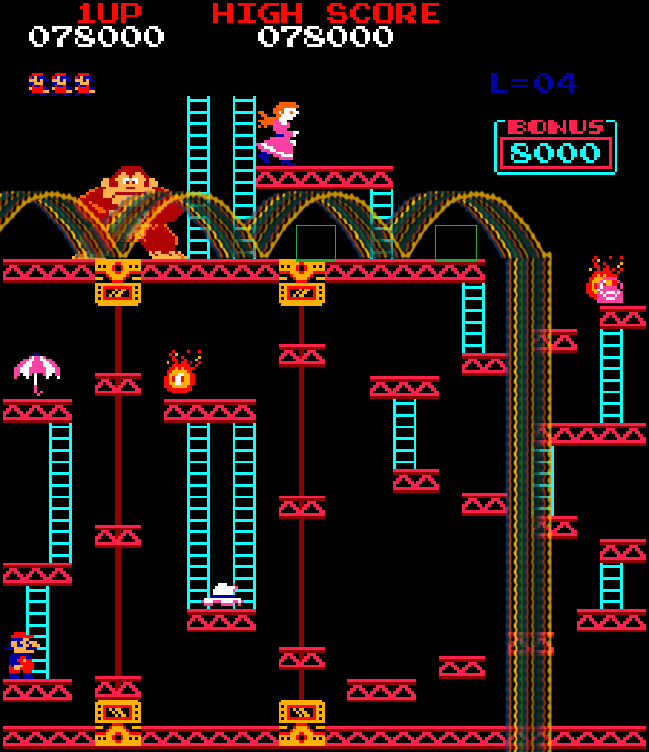
Another arcade classic strategy rundown, and again c0ncerning Donkey Kong. As the video rightly notes, the Springs board, a.k.a. Elevators, is most devoted players’ greatest barrier to playing to the kill screen, and even pros mess it up sometimes. I think it’s the worst part of the game, personally. Donkey Kong is great, says I, because it’s open to multiple strategies, while the later Elevators boards have to be finished a specific way, all because of those springs. That way is what this video (4m) is about.
Sadly the video has been made non-embedable, so it’s up to you to follow the link, if you care. The video encapsulates information on donkeykongforum.net (which it mislinks). That link is some hardcore geekery, of the kind beloved to Set Side B’s cadre of pixelated aliens, so please take a look.
Image from donkeykongforums.net.
Here’s the basics, in text form. Donkey Kong gets more difficult over the course of five “levels.” These are different from “boards,” a.k.a. “racks” or “screens.” In the corner of the screen there’s a notice, “L=X” where X is some number. That’s the Level. It goes up by one every time you finish a Rivets board.
The problem is, starting with Level 2, the spots at which the springs hit the ground is slightly randomized. The final climb up to Pauline’s platform is super dangerous, since Mario is vulnerable the whole way. Level 4 is the hardest difficulty for the springs on Elevators, and you have to handle it a very specific way: climb up to the first safe spot, wait for a spring that comes out bouncing at a specific location (near DK’s right foot) then running to another safe spot, then waiting for another specific spring speed to rush over and up the ladder.
So go forth and conquer the elevators, and as Coily the Sprite reminds us:
Our retro arcade strategy week is over, but this is a related video that I’ve been sitting on for quite a while. The Disconnector made a very nice strategy video (20 minutes) for Namco’s cult favorite cat-and-mouse game Mappy. It works as both an introduction and a guide to the game as it develops.
Not only is the information good, but it’s really well put together! Looking through the rest of their channel, while the post about other games (most recently about Robotron [8 minutes]) it seems to be the only strategy video of its sort. I hope they make more, I think they have a talent for it!
You play Q*bert, and at first it seems simple. Level 1, you jump on each cube once. Slick and/0r Sam may change them back once in a while, but you can just jump on them again.
Level 2, you jump on each cube twice. That makes each level twice as long, but still not much of a problem. The rising difficulty here comes from more and faster enemies.
Then you reach Level 3, and Q*bert becomes a much different game. Now jumping on a solved cube unsolves it. If you don’t work out how to handle this, levels can drag on indefinitely. It’s a bit of a wall for players here, and Slick and Sam become much more annoying.
Level 4 is similar, except you have to jump on each cube twice, and jumping on one after it’s complete changes it back to the intermediate color. But worst is Level 5, where jumping on a solved cube changes it back to the original color. This is a huge change, for it means the pyramid can actually become unsolvable without using a Disk, or waiting for Slick or Sam to come in and reset some of the cubes. For more details, I refer you to the video. You know, the one I embedded a few paragraphs up. Go! And if you think that’s nuts, check out what happens in the unreleased sequel Faster, Harder, More Challenging Q*bert (GameFAQs link).
Something I’ve thought is interesting about Q*bert, which is also true of Pac-Man, is that it’s like a turn-based game, but where you can play around with the timing of the moves. I’ll try to explain.
While both games let you decide when to make decisions, both encourage playing in a discrete, point-by-point way. When Q*bert lands on a cube, there’s a limited number of decisions they can make, other than waiting to make your move. In Pac-Man, your moves are constrained to the maze paths, but you can turn slightly early, you can pause when you hit a wall, and you can double back at any point. You usually don’t want to pause or double back in that game, because they introduce uncertainty in patterns (although a few patterns rely on them, which makes them much harder to perform). Q*bert is resistant to patterns, using pseudorandomness to affect the paths of the balls and most enemies, and the player’s ability to break out of the rigid temporal confines of that game’s movement is more helpful.
Contrast both games to Robotron and Defender. Those games have “free” movement, they’re not confined to a playfield with limited choices but let the player move around how they want. In actuality they’re games where the turns are taken in real time each frame. That adds a much greater role for player skill, but it also requires you to be much more precise.
Defender’s difficulty is legendary. Craig Kubey in The Winner’s Guide to Video Games said it was like being locked in a closet with a swarm of killer bees, and I actually think that’s not overstatement. And yet, people have flipped Defender’s score counter many times in a single game.
In an 18-minute strategy session, Joe Dearman explains the basics of playing Defender well, but I’m afraid if you don’t have a certain base facility it might be hopeless. Although I’m generally good at video games, I don’t seem to have it myself. Take a look and see if this looks like something you might be good at, but be warned, Defender’s controls themselves are complicated, with a lever and five buttons, although I dunno, game controllers these days tend to have many more than that. It is important, however, not to underestimate this game. It will rapidly annihilate you if you aren’t very good.
Both Defender and Robotron 2084, mentioned yesterday, were made by Williams, and designed by Eugene Jarvis, who still works in arcade game production today, or did last time I checked.
Another thing these games have in common is they’re very adjustable. Operators can choose starting difficulty, ending difficulty and on which wave it’s reached. This thread at arcade-museum.com breaks down the different romsets and differences between them. The earlier roms, “Blue” and “Green,” are generally harder, and increase in difficulty through 99 possible levels. The most common and latest set, “Red,” only has 30 effective levels.
At the higher numbers of Blue and Green, weird behavior can be seen. Defender has an enemy called the Baiter, which exists to harass the player if they take too long in clearing a wave of other enemies. At maximum difficulty Baiters become hilariously numerous, the game sending them in about once every two or three seconds. Watch a few minutes of this game with the wave difficulty settings cranked up to maximum from wave 1 (39 minutes). The extra ship level is set it easier than normal, needing just 5K to get an extra, and it’s set to restore all the Humanoids every wave, but that’s mostly to make the game possible, although there does exist video of someone surviving maximum difficulty with ships and Humanoids at normal settings, up to a score of 909K. (1 hour 7 minutes, somehow).
Here is the first of those two links, I’ll leave the other for you to click on if you’re interested. Both of them have the amazingly persistent Baiters, and in both of them the player manages to hold up under the pressure, for a while anyway.
It’s the third of this week’s classic arcade strategy find posts, and today’s dedicated to the original twin-stick shooter, Robotron 2084.
Robotron’s what I’d call a very pure game. It’s simple in play, nowhere near as complex as Eugene Jarvis’ first game Defender, but deep despite it. The left joystick moves, the right joystick fires, and until you get used to that you’ll have short games. In fact, you’ll probably have short games regardless. It is ruthless.
These videos feature host “Greg” and star player “Darrin,” who is the one giving most of the advice. The first video covers the first nine waves (5½ minutes). They set the template for the game: there are theme levels that cycle every ten waves. There are Spheroid, Quark, Brain and, for levels ending in 9, Grunt waves that completely surround you with enemies right from the start, and each poses its own kind of challenge.
The videos mention three parts, but it appears that only two were ever uploaded. They mention a site in their descriptions, robotron2084guidebook.com. In the 12 years since the videos were posted that site’s gone dark, but being a text site it’s pretty well preserved on the Wayback Machine, and has lots of good information. They also mention video on the high score site scoreground.com, but sadly it’s also defunct, and the mentioned video that was hosted there is probably lost. If there’s one good thing about Google, I guess, it’s that they let Youtube videos persist on their site for decades without culling them too much.
That a single game can inspire so much discussion so long after its release speaks volumes about the quality of its design. A lot of it has to do with how much randomness is in the game. Even the best players die sometimes! Donkey Kong is heavily resistant to rote patterns, although there’s still things the player can do to subtly affect each board, and make it more manageable. On the Barrels boards, on higher levels, you can affect when barrels decide to come down ladders by steering towards them as they reach their decision point.
I’ve brought upSimon Tatham’s Puzzle Collection here before. It was then, and still is now, one of the great wonders of the World Wide Web, a completely, utterly free, in both beer and libre, collection of randomly-generated puzzles of 40 different styles and counting, available for pretty much every platform. Not currently for Mac, because Simon’s Mac stopped working, but you’re free to compile it yourself if you can.
Let’s delineate the platforms: Windows, Linux, Mac (with the above caveat), Android, iOS, Java and even Javascript. You should be able to field one of those options, right? And which puzzles are provided? Black Box, Bridges, Cube, Dominosa, Fifteen, Filling, Flip, Flood, Galaxies, Guess (Mastermind without the trademarked name), Inertia, Keen, Light Up, Loopy, Magnets, Map, Mines(weeper), Mosaic, Net, Netslide, Palisade, Pattern (a.k.a. Nonograms, or Picross), Pearl, Pegs, Range, Rectangles, Same Game, Signpost, Singles, Sixteen, Slant, Solo (genericized Sokoban), Tents, Towers, Tracks, Twiddle, Undead, Unequal, Unruly and Untangle. Not only will the software generate an endless of stream of puzzles for you to solve, often with a user-selected difficulty, but some platforms will even print out books of these generated puzzles for you to solve, along with an answer key.
The puzzles I’ve boldfaced are what I call Nikoli-style puzzles. Nikoli is a popular Japanese puzzle magazine, the original home of Sudoku, and has a particular kind of logic puzzle that’s really satisfying to play. They usually have simple rules, but with profound implications, and with some thought you can deduce processes to help you solve them. Sudoku aficionados will immediately know what I’m talking about. The main subject of this post is about one of these Nikoli-style puzzles, Dominosa.
Nikoli specializes in human-created puzzles, and Simon Tatham’s Puzzle Collection creates its puzzles by computerized process. These kinds of puzzles really are better when set by hand. But that doesn’t mean the automatically-generated kind doesn’t have its place.
Also, Simon Tatham’s puzzles are completely free, don’t track you, and don’t have ads, making them a real rarity in this money-desperate age. If you need any proof that the app stores of Apple and Google are rigged against you, then consider that the Puzzles have been available on both their platforms for over a decade, but their discovery algorithms never seem to surface them. (Here’s some help in finding them: Google Play, Apple App Store.)
To give you idea of what kind of puzzles these are, and to get you on your way to solving one kind of them, here are my observations about Dominosa. The rest of this post is pretty long, so this is your chance to check out if you don’t want basic tips on how to solve it.
Dominosa, KDE version
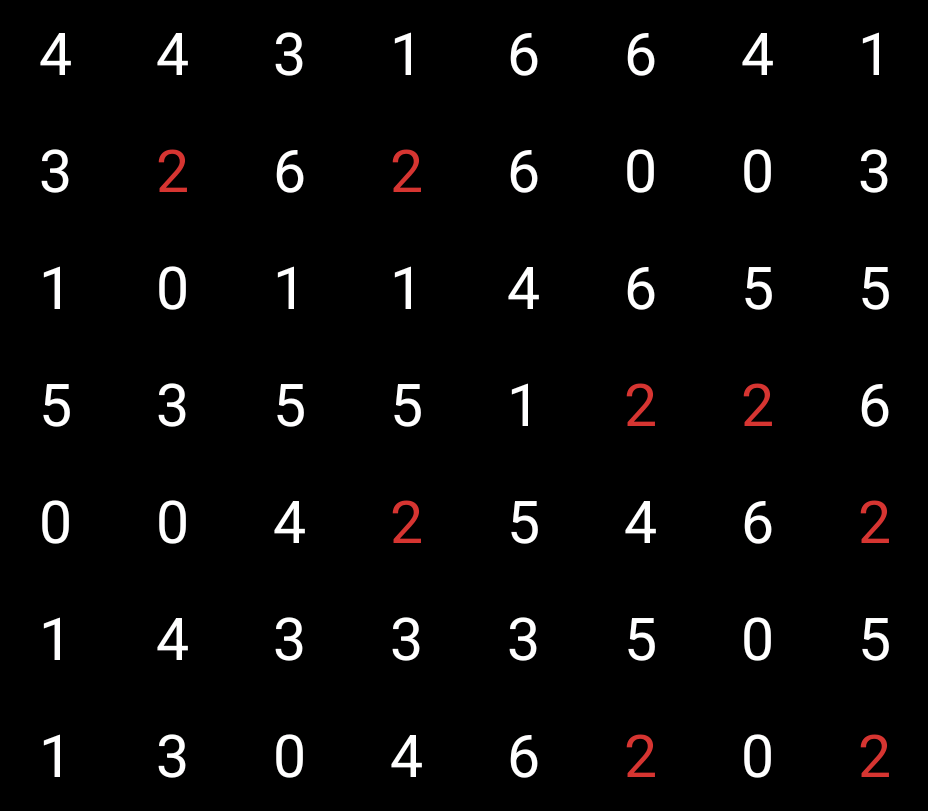
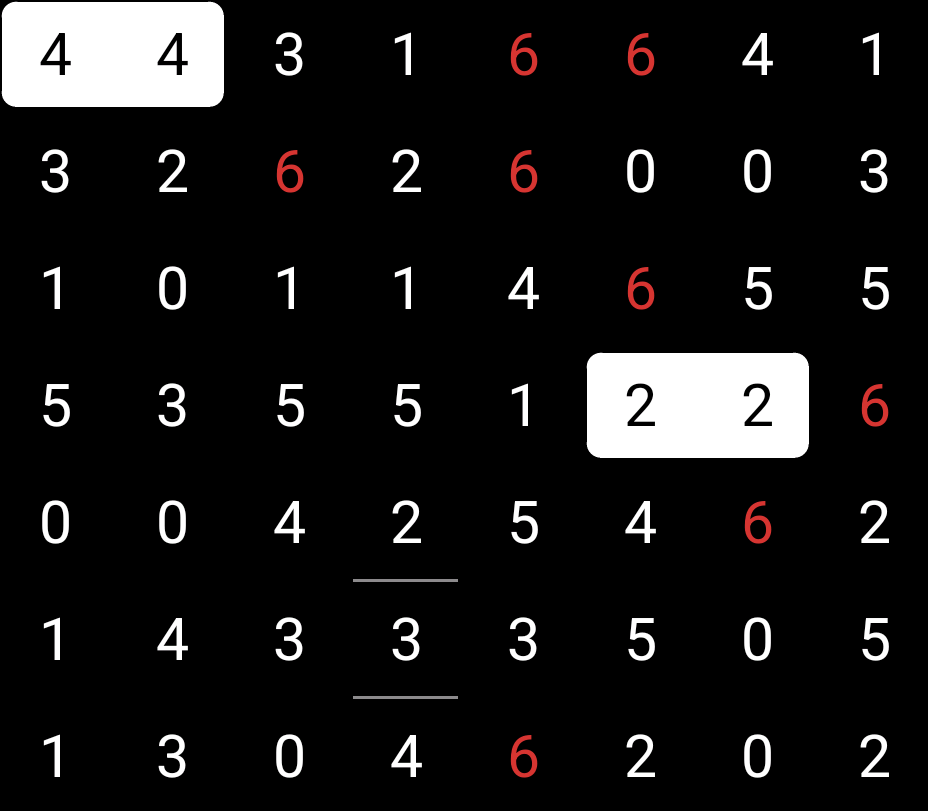
Dominosa presents you with a grid of numbers, usually from 0 to 6 (you can choose to solve larger puzzles). The numbers represent the values on a field of dominoes, but the edges between them have been removed, leaving only the numbers of pips that would be on their two sides. Your job is to place dominoes on the field, over the numbers, to reconstruct where they were originally. The puzzle is solved when every number is accounted for, filling the board with exactly one domino of each pair of values, with no contradictions.
I’ll present a series of images representing working out one of these puzzles at a basic level of difficulty. Not all of them are as simple as this.
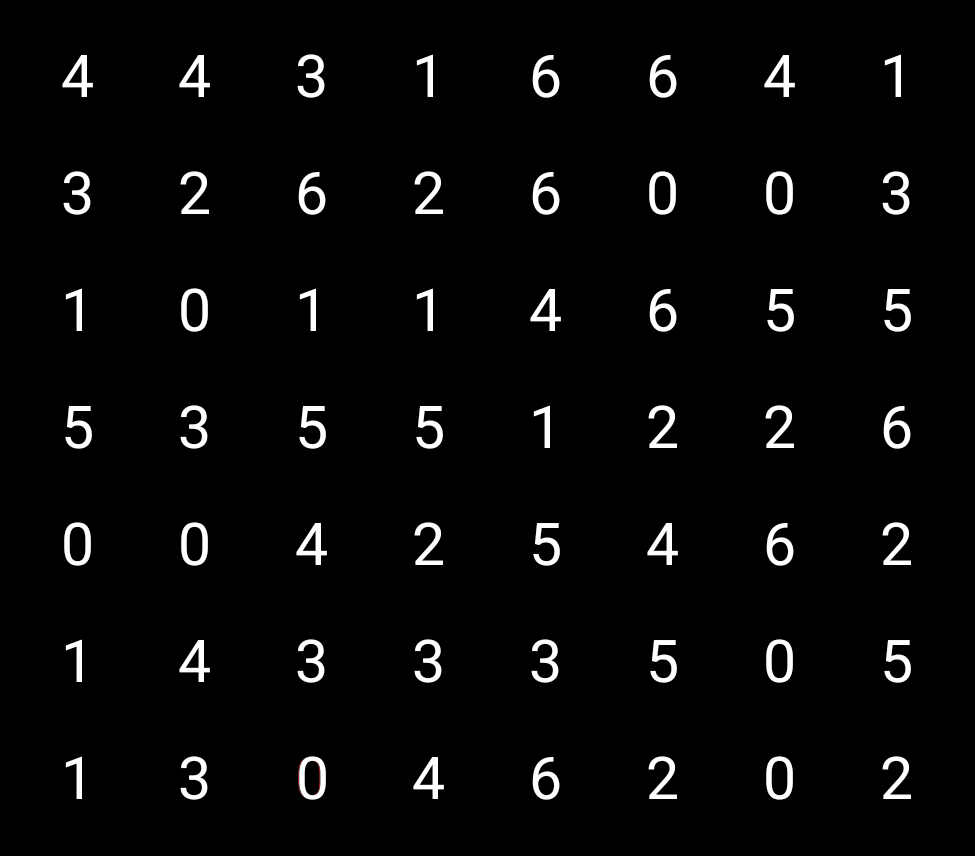
A Dominosa puzzle, from the Android version of Simon Tatham’s Puzzles.
The way I solve these, I first look through for pairs of numbers. If you’re on a version of the Puzzles with keyboard support, you can press a number to highlight all of its values throughout the board. If you don’t have a keyboard, there will usually be number buttons onscreen that fill the same purpose. There may also be Undo/Redo buttons; if there aren’t, you can use Ctrl-Z/Ctrl-R for that.
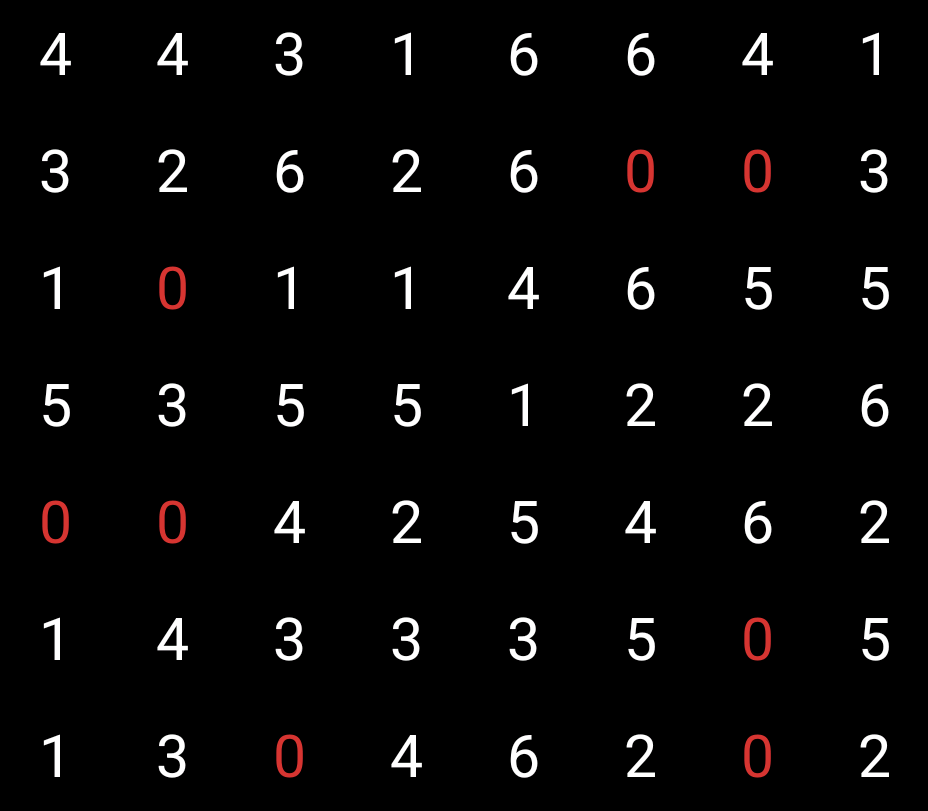
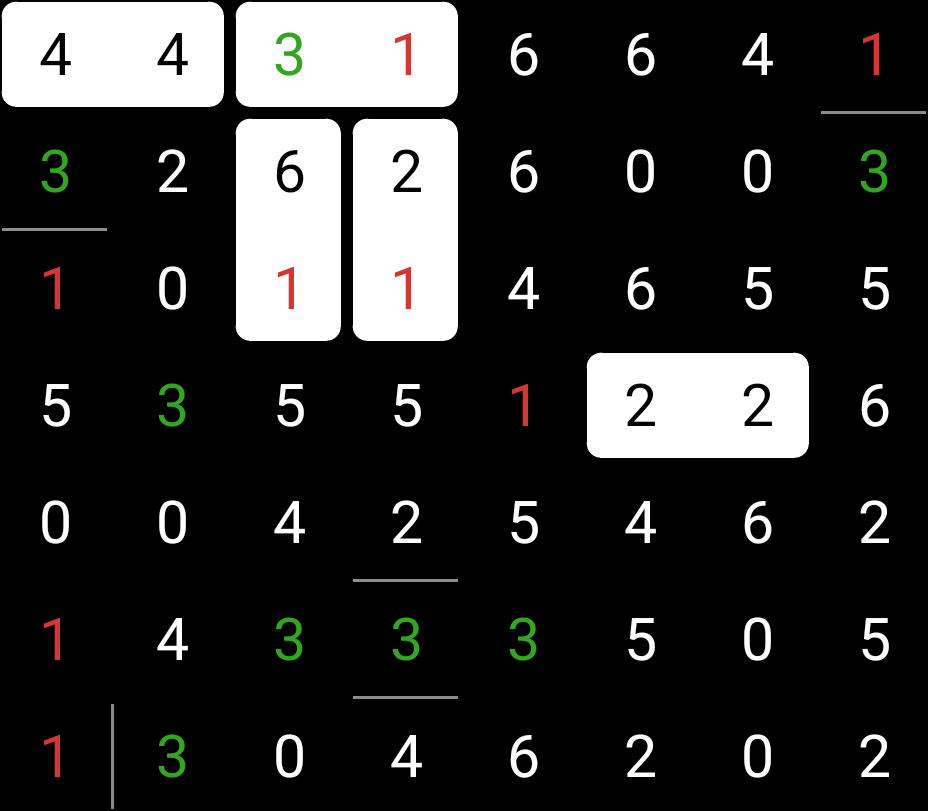
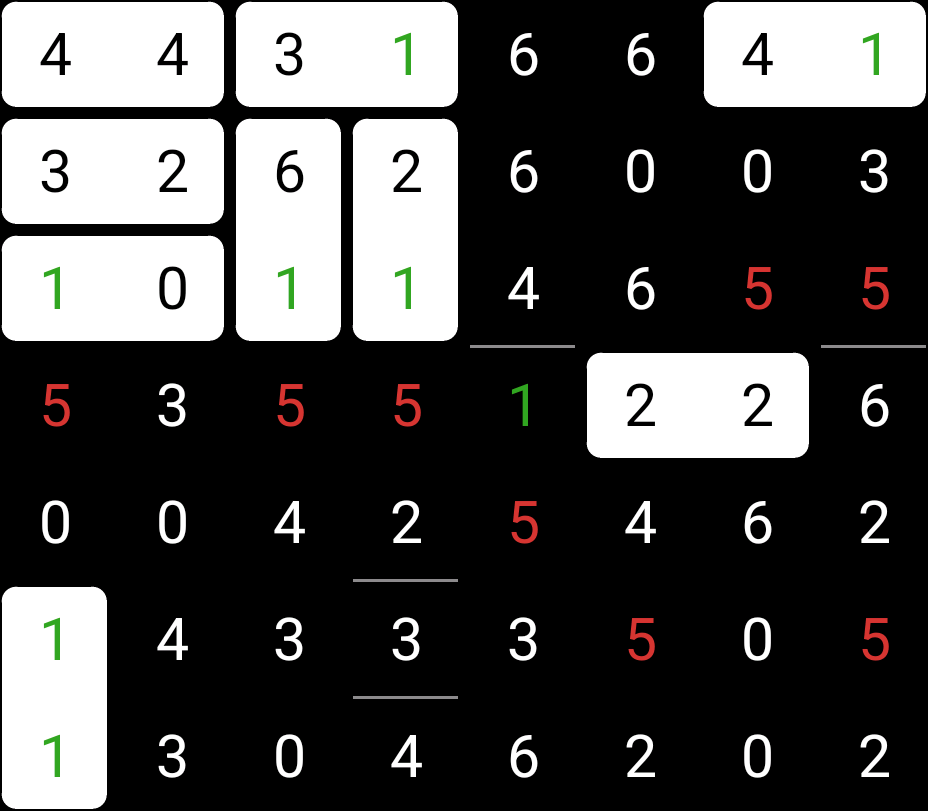
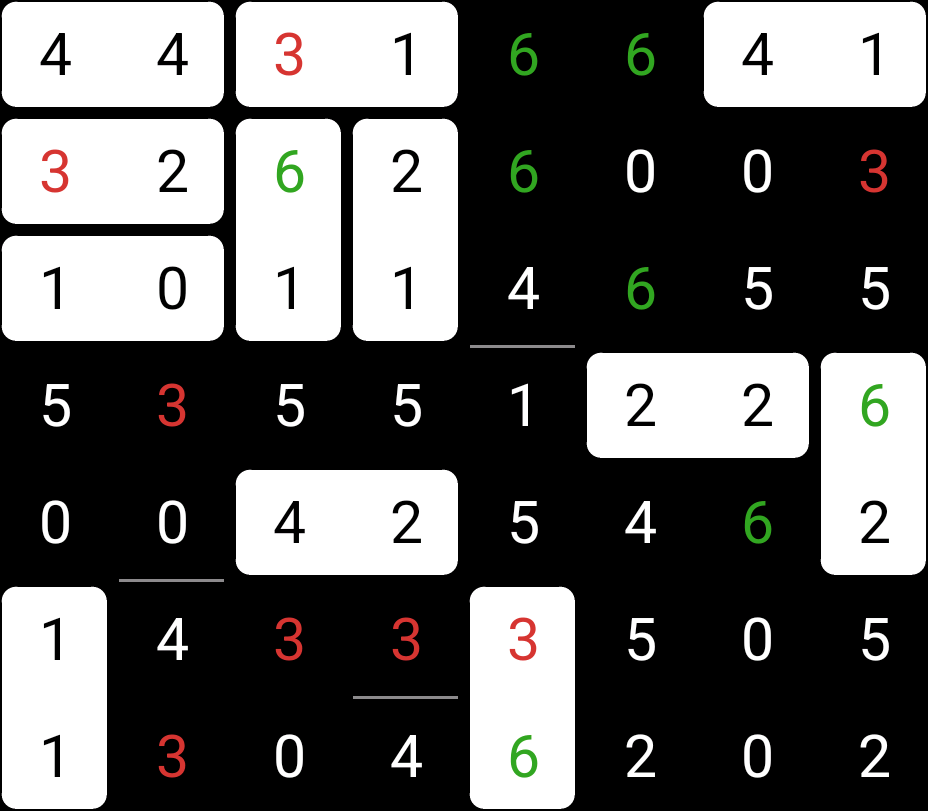
I start out by looking for all the zeroes. Here they are:
In a double-six puzzle like this one, there will always be eight of each digit. What I’m hoping to find is exactly one isolated pair of one of the numbers. There’s only one domino with each pair, from 0-0 through to 6-6, so a single pair means that a domino must be there.
No luck with Double-Zero, so I keep going, checking each number in turn. (You can only have up to two digits highlighted at once; pressing a number again turns off its highlighting.)
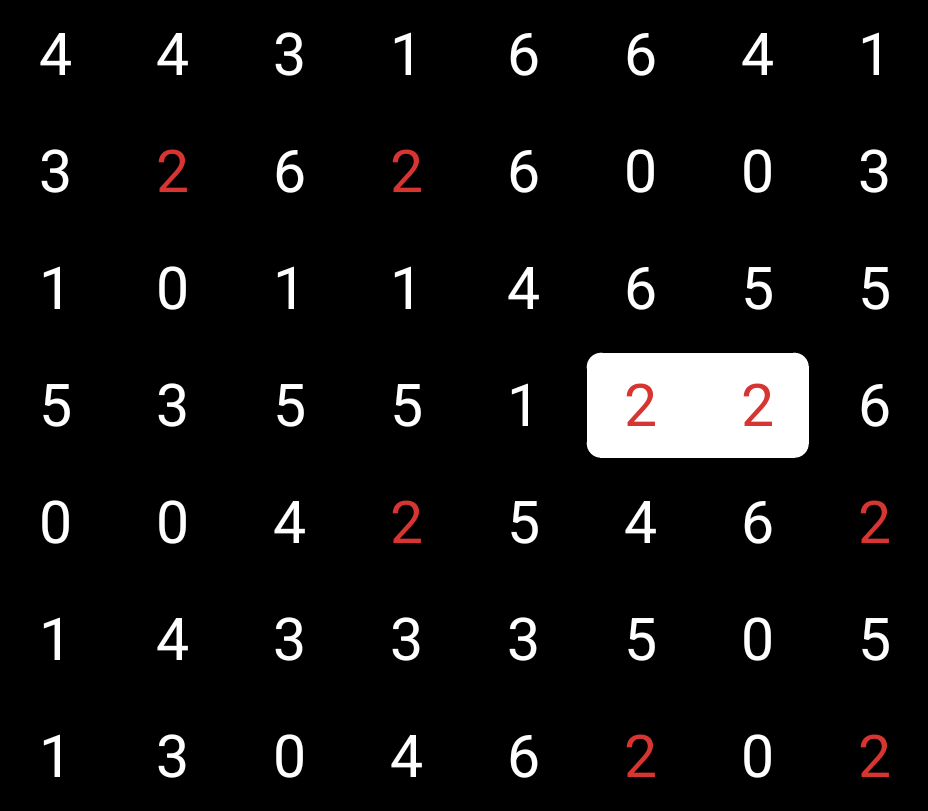
I have better luck with the 2s: there’s only one adjacent pair. So I click on the space between them to place a domino, as so:
In Nikoli-style puzzles, as you correctly fill out each little bit of the puzzle, it makes the rest of it slightly easier. When you make progress in solving it correctly, the puzzle seems almost to knit together, until the whole grid is complete.
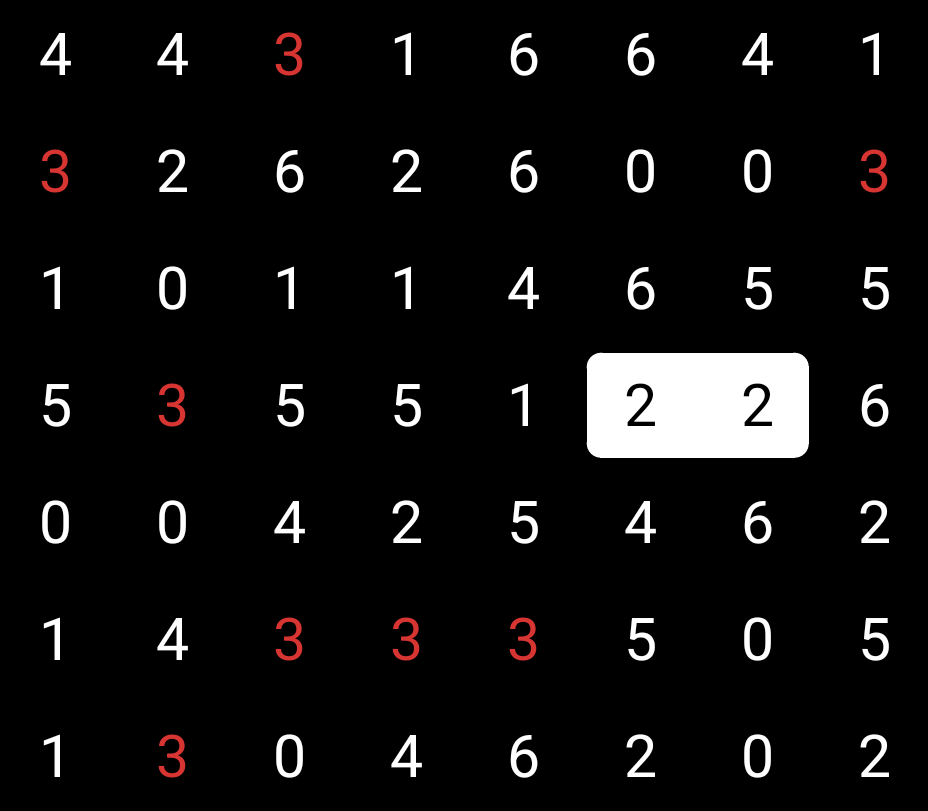
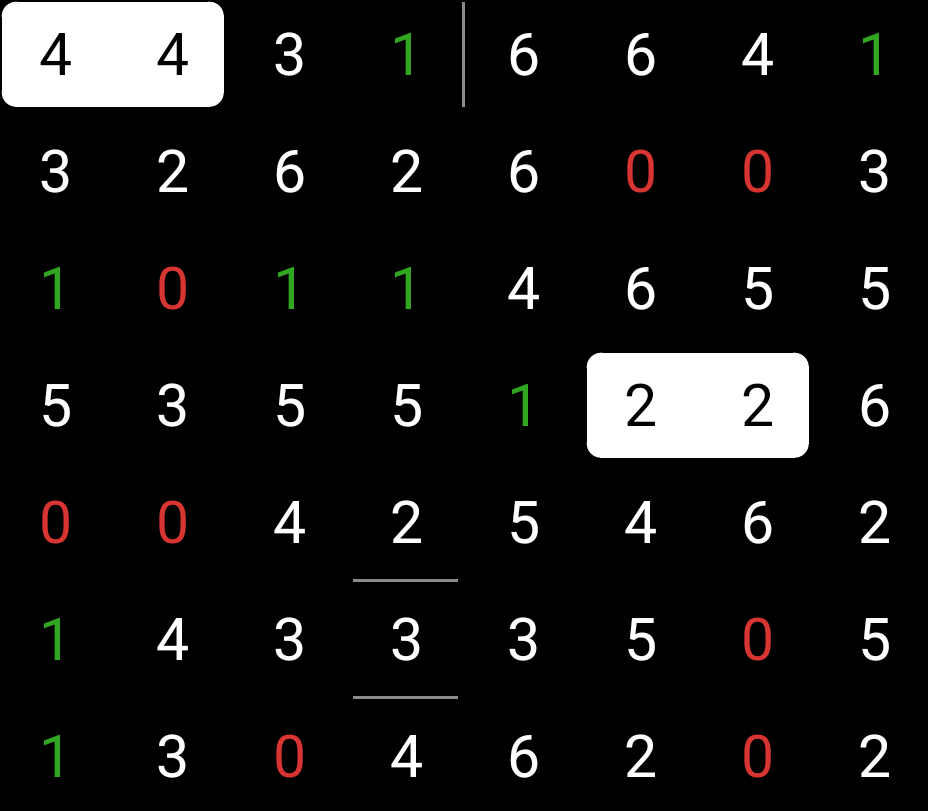
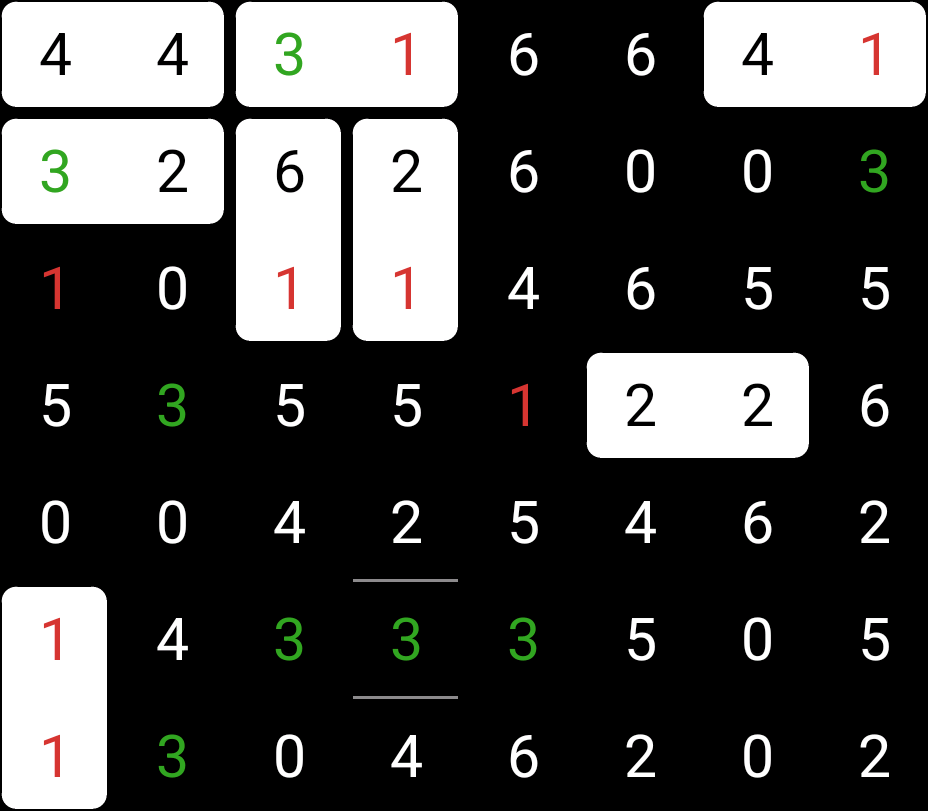
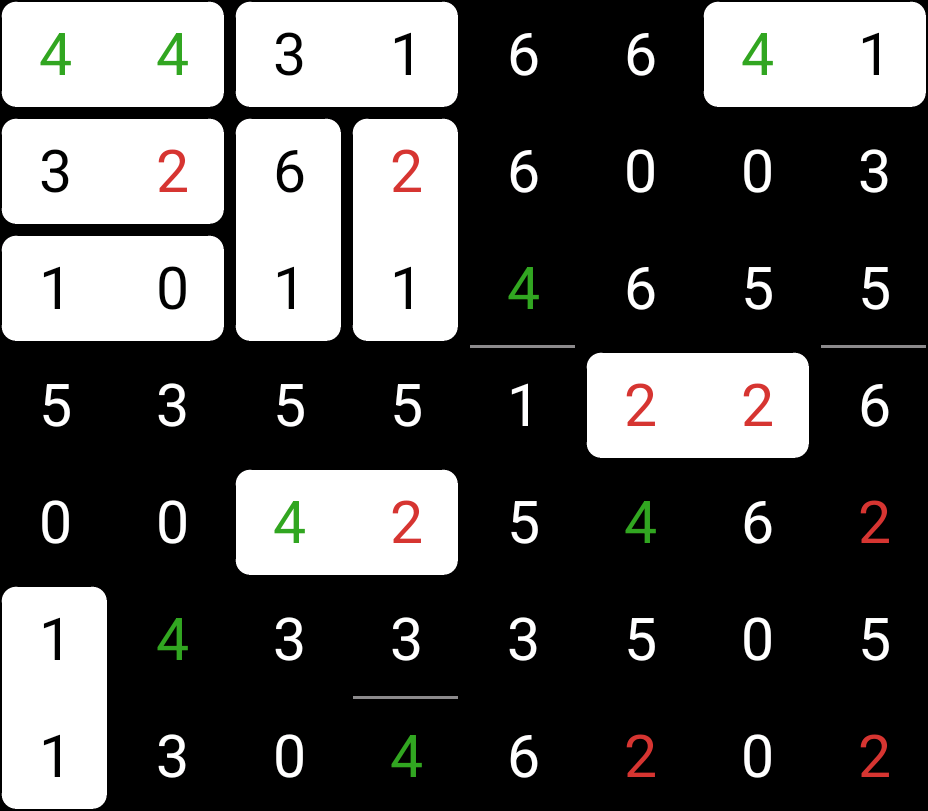
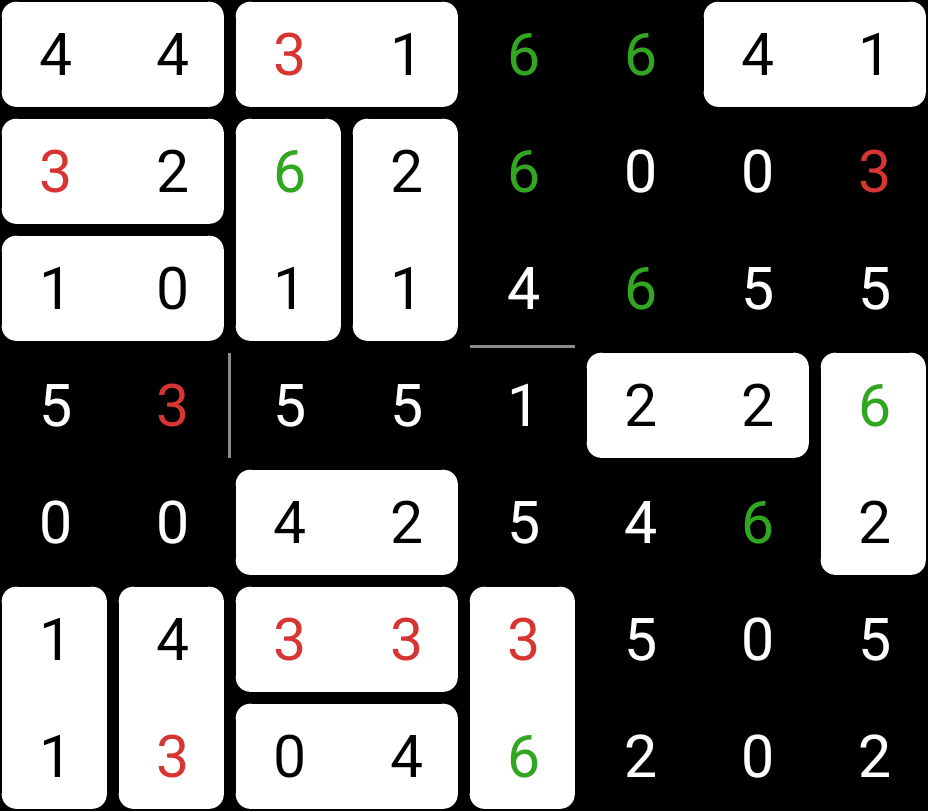
It’s not just single pairs that are useful though. Sometimes you’ll find single triples, either in a straight line as here, or in an L-shape. So long as there aren’t any other adjacent digits of that value in the puzzle, then you know that one of the two possible pairs must be the correct one.
How is that useful? In the below case, there are borders between the digits that the two possible placements have in common. Since one or the other must be correct, the two domino edges that the possibilities share must be edges in the solution. We can mark edges in Dominosa with the right mouse button, or on mobile platforms with a long press:
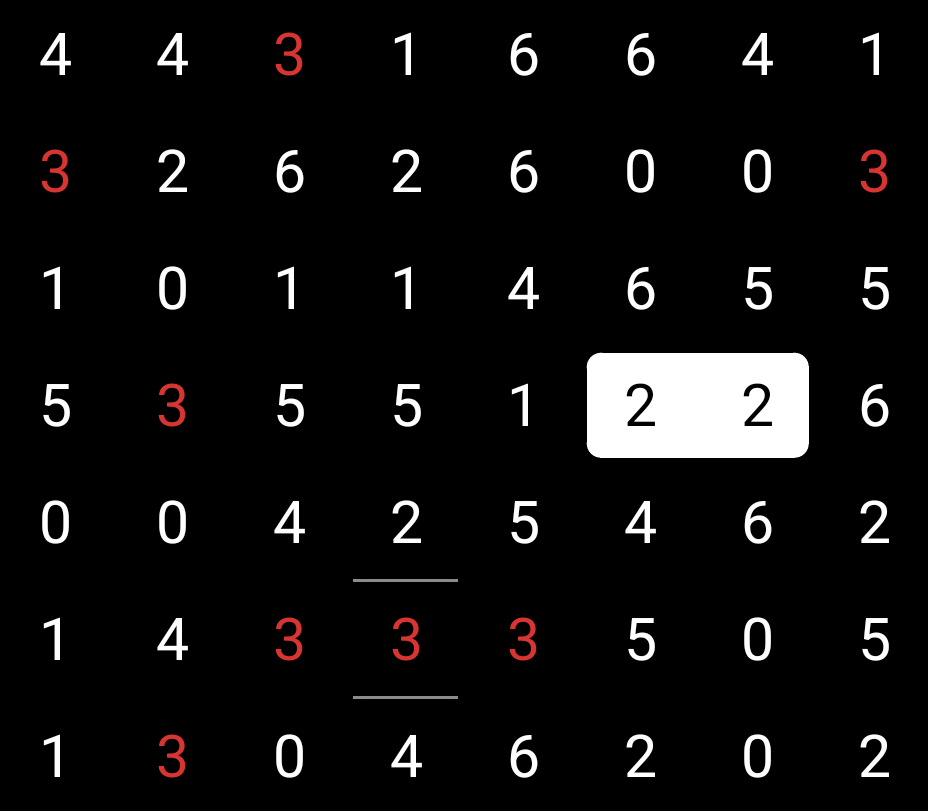
Above I’ve placed the horizontal edges that the two possible Double-Three locations have in common.
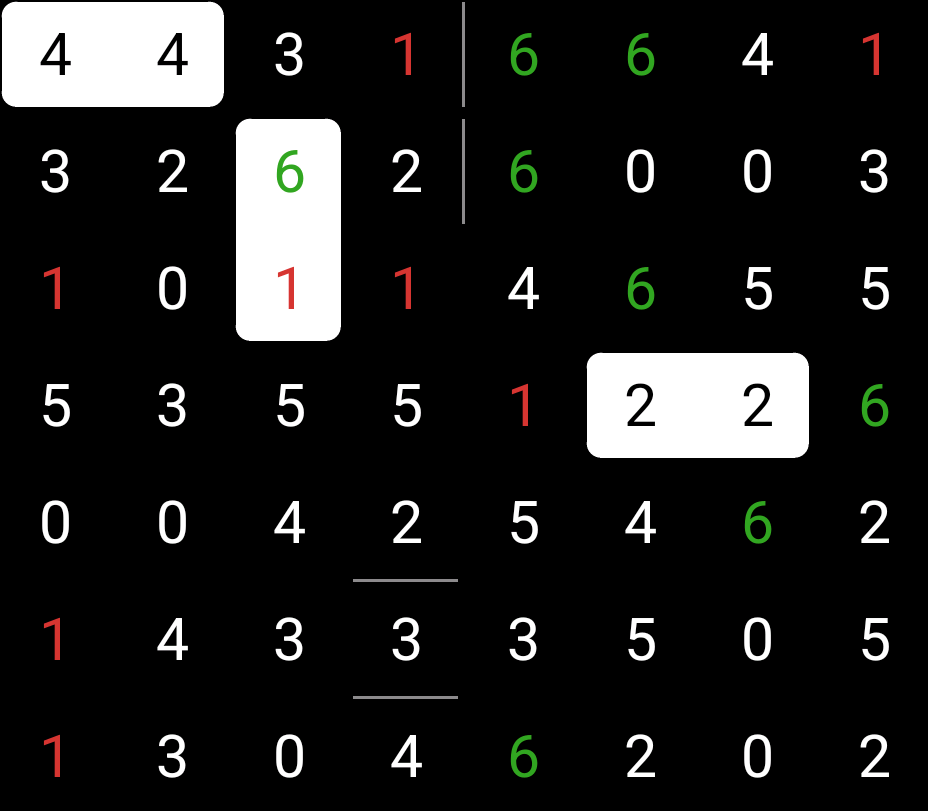
Moving on. There’s a single pair of 4s, so I’ve marked that domino. And there’s an L-shaped arrangement of three 6s. It’s on the outside of the puzzle, so there’s really just one edge to place, like so:
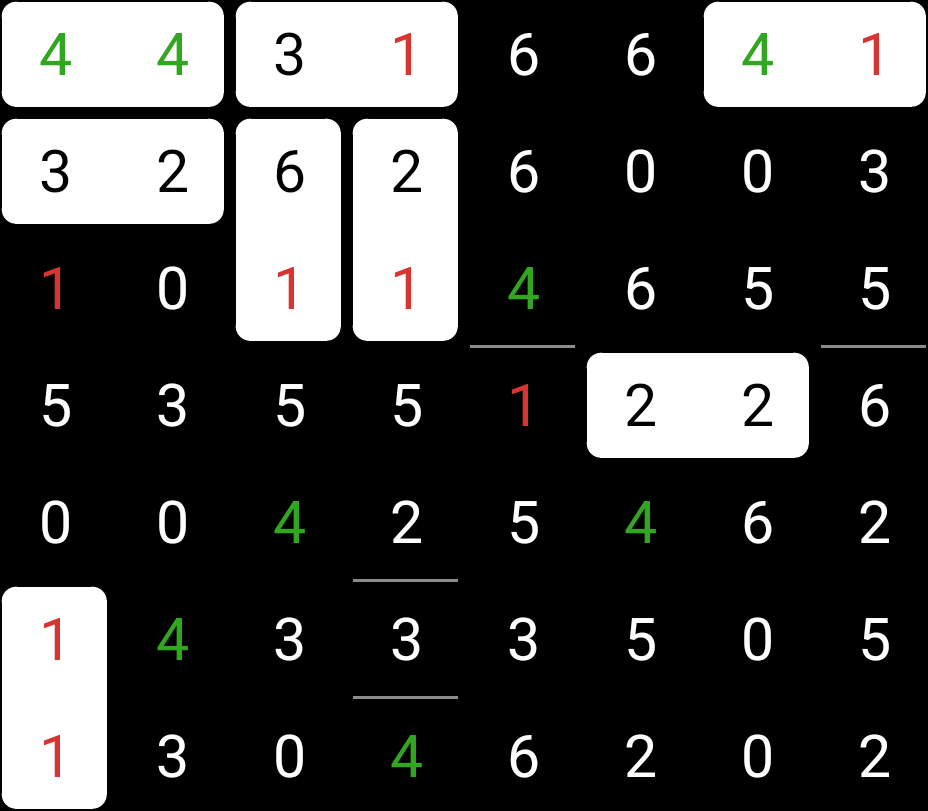
I’ve also started on the second step of the puzzle, looking for non-identical domino pairs. This is where the ability to highlight two different numbers becomes useful.
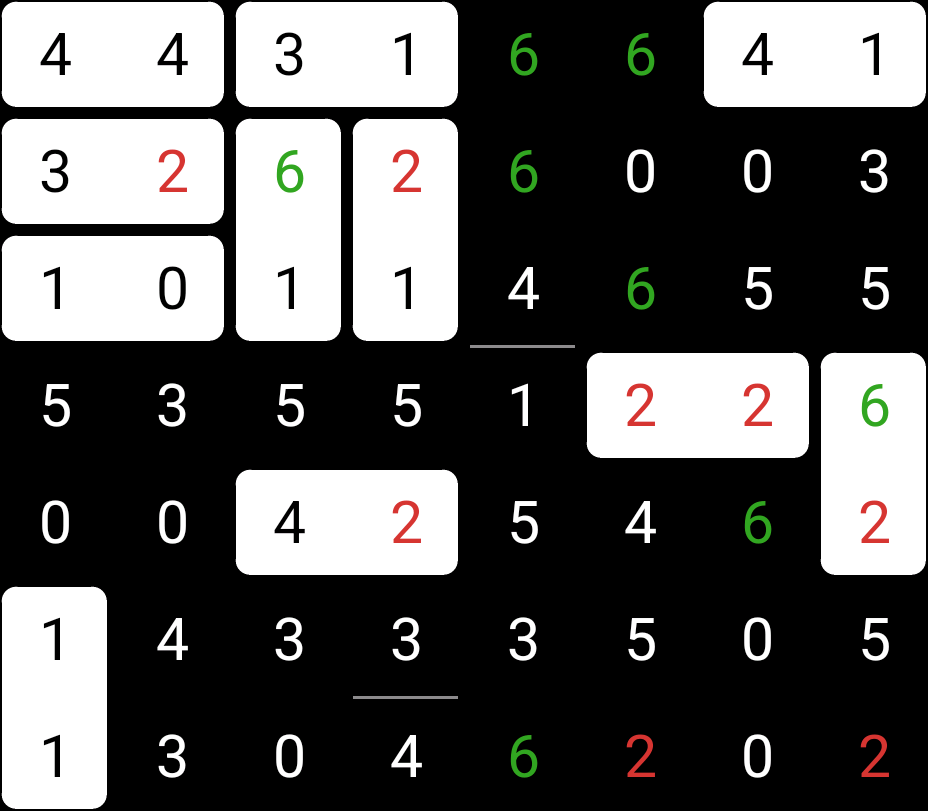
Now we’re looking for each possible 0-1 combo. There’s three possibilities here, which isn’t helpful.
The process I use is to check for the dominoes with one zero: 0-1, 0-2, 0-3, 0-4, 0-5 and 0-6. After that, the remaining pairs beginning with 1: 1-2, 1-3, 1-4, 1-5 and 1-6. When I move to the next digit, there’s fewer to check, because we’ve already done some: 2-3, 2-4, 2-5, 2-6; then 3-4, 3-5 and 3-6; then 4-5, 4-6, and finally 5-6.
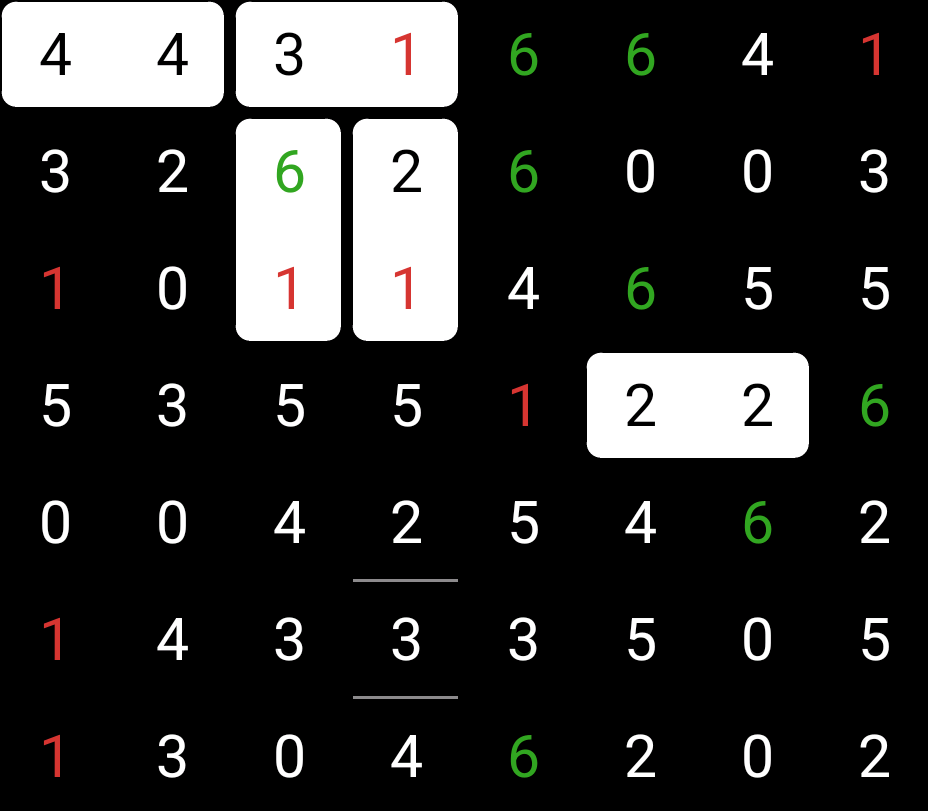
Of the 1-2 domino, there’s only two places where it could be, so I can place edges alongside them. Also, there are two 1-6 pairs. But because we’ve ruled out one of them, when we tried the Double-Sixes, there’s only one pair left that could possibly be the domino.
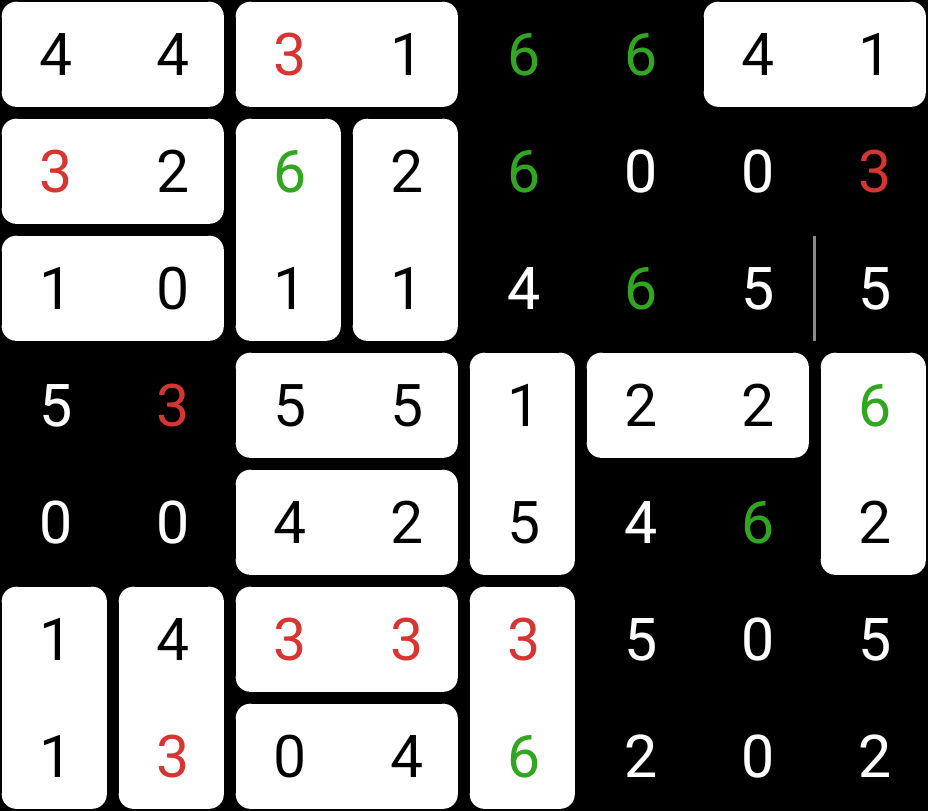
Ah. Now we have one of the best things we can find: a dead-end. A place with a cul-de-sac, where a domino has to go regardless of its digits. Every digit in the puzzle must connect in one direction, and the 3 to the right of the 4-4 has only one way to go, so that must be where the 3-1 goes. And because of the two edges nearby, the 1-2 also has a location where it has to go.
The great thing about these placements is, they weren’t narrowed down from the lack of other pairs of digits. Since the 3-1 has to go there regardless, all the other 1s by 3s on the board can’t be options, so we can place edges between those numbers.
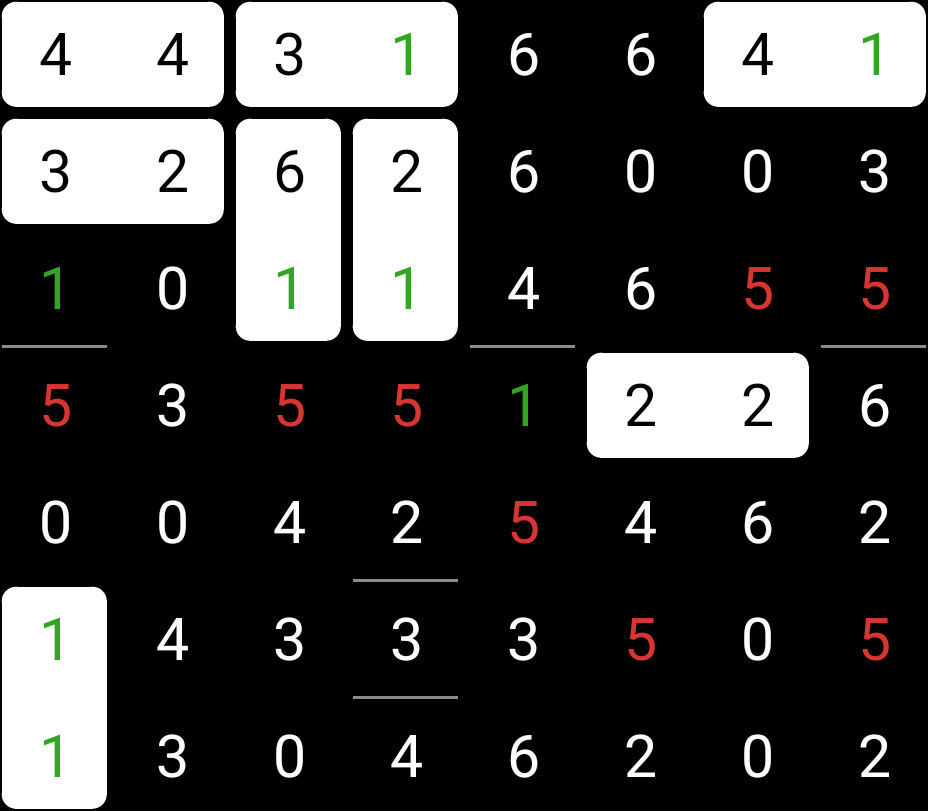
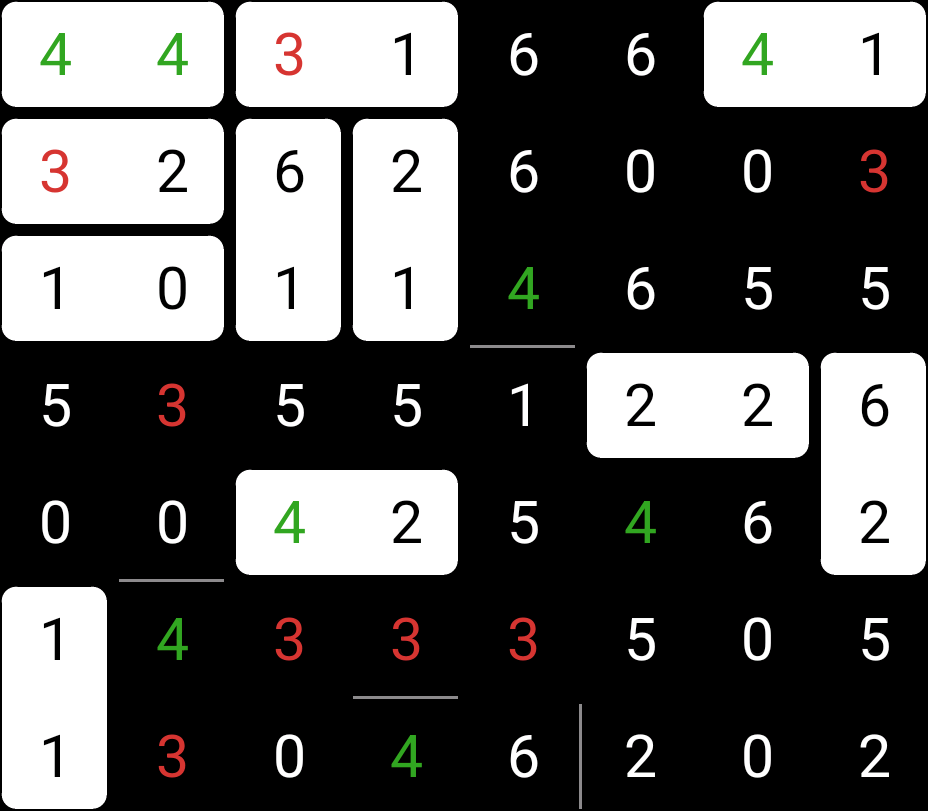
We’re lucky again; each of these edges produces mandatory domino placements, in the same way!
These, in turn, allow us to place another domino, a 1-4, and to block an edge between another 1 & 4. It results in an unfilled region of the puzzle with only one entrance. Dominoes have exactly two ends, so any region containing an odd number of digits is impossible. This lets us place a useful edge, between a 5 and a 6, because if the edge were below the 6 instead, the region would have 11 digits in it.
Continuing with checking for pairs, there’s a triple, a 1-5-1 with no alternatives around them. Since each puzzle must have exactly one 1-5, it has to be one of these two places, so all the other 1-5s in the puzzle must have edges between them.
And that means a mandatory placement for the 1-0.
Hah, I neglected the mandatory 6-2 at the right side of the puzzle! But I did find a single remaining instance of a 2-4, which I filled in.
And then I noticed the 6-2:
We’ve done about half the puzzle now, but really we don’t have much left to do. The 6-2 we place means we can place edges between the 2 and 6 at the bottom of the puzzle, as so:
We can hurry through the rest of the puzzle. There’s a single triple of 3-4-3, so we can place an edge above its 4:
There’s a single 3-6:
That creates two dead-ends, a Double-3 and 0-4, and then a 4-3:
From here, most of the rest of it can be worked out with the same principles. When we get to small areas like this, often figuring out where to place one domino, or even edge, makes the rest of its region obvious. There’s a small region with a single path into it, so the fact that regions can only have an even number of digits comes into play again.
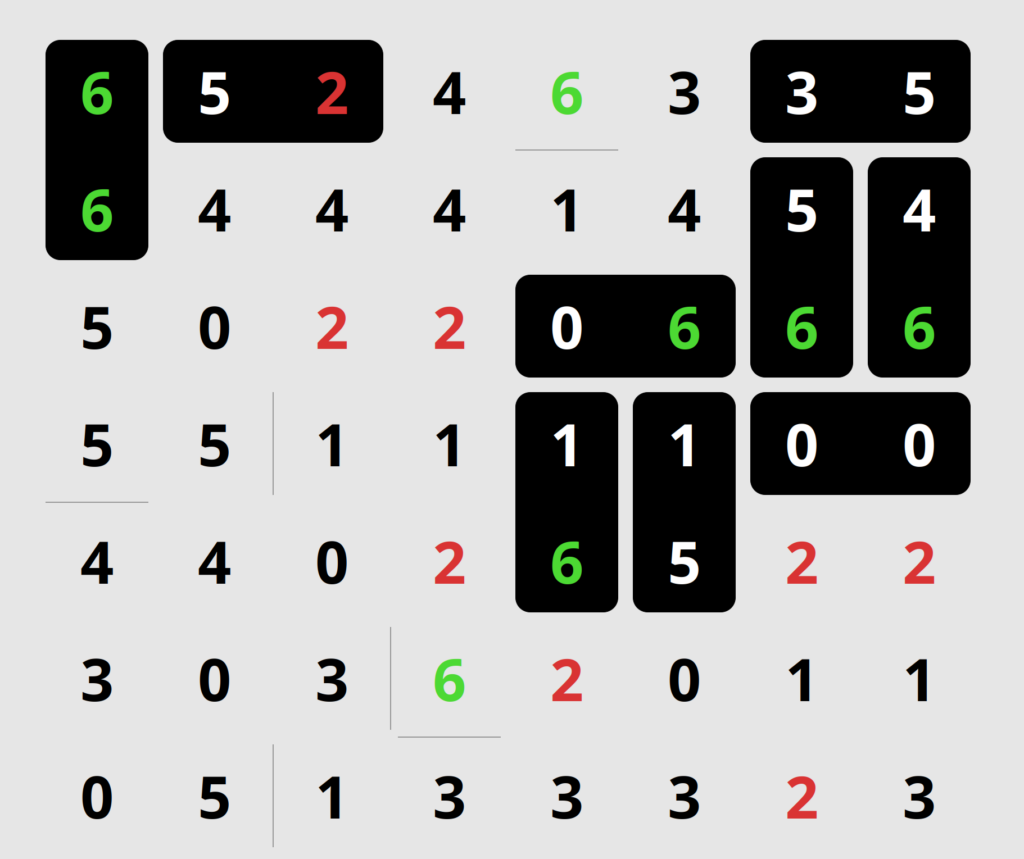
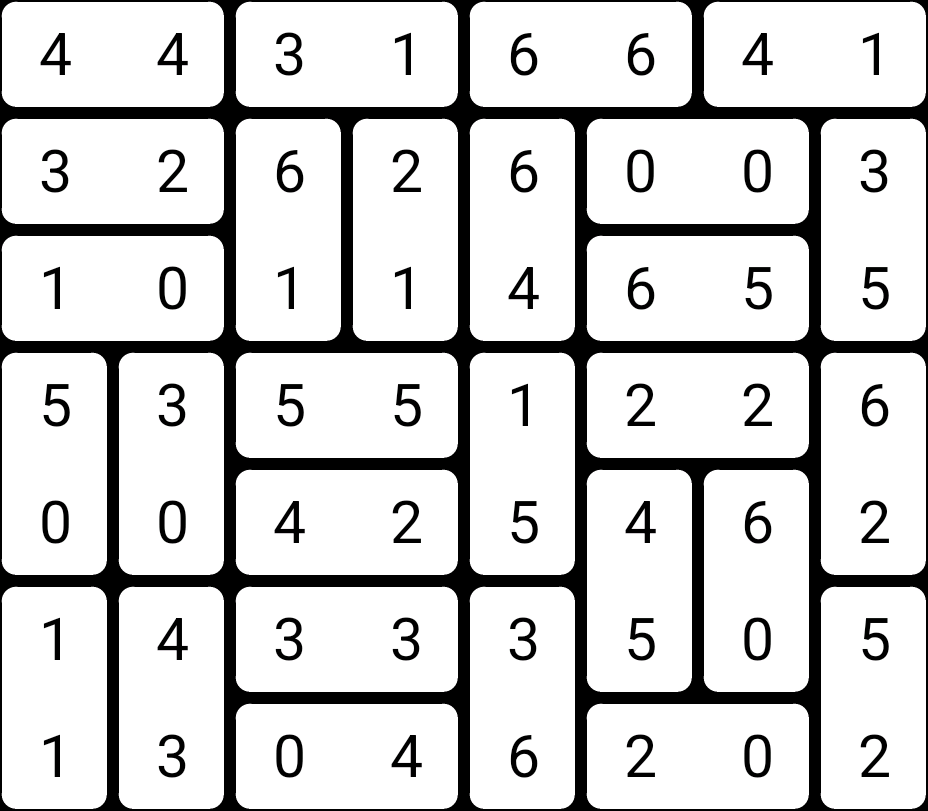
This puzzle is almost solved, so let’s just jump straight to the solution:
As noted before, most puzzles aren’t this easy. Often after you’ve been through all the possible pairs of digits, you still have a significant amount of puzzle left to do. Usually, if you look carefully at the puzzle, you can figure out placements that, if made, will result in contradictions to the rules of the puzzle. If you find one of those, you can then place an edge between its numbers.
There’s a couple more tricks I know of, but they start getting harder to explain easily here. I’m by no means an expert: I’m sure that experienced Dominosa solvers know tricks I have yet to figure out. I also don’t want to explain too much about how to solve these puzzles, as I got a lot of entertainment in figuring out my solving process, and I’d hate to deny that to you. Most of the processes I’ve mentioned so far are pretty obvious implications of the rules. Revealing the less obvious tricks feels a bit like a spoiler.
One great advantage you have in solving Nikoli-style puzzles on a computer is the Undo feature. Like doing Sudoku by hand, if you reach a point where tricks fail you and solving algorithms leave you stranded, you can progress by making assertions, basically guesses, then working them through until you reach a contradiction. There’s a whole strategy to this: you want to make a single binary, this-or-that guess, and to pick an unlikely guess, one that will prove itself incorrect quickly. Then you can erase the marks you made following your guess, and then mark its opposite.
On a computer, you can undo until the point where you made the guess, with Ctrl-Z. On paper, you’d not only have to remember all the marks you’d made since the guess, but you’d have to erase them all, which makes a huge mess. If you undo too far, you can press Ctrl-R to redo the removed moves. It’s really a tremendous aid!
Give Dominosa a try, and see what you can deduce. If you want to try some of the other Nikoli-style puzzles, that feel similar but have a different process, I recommend Loopy, Slant and Bridges.
Ms. Pac-Man. Currently on the outs with Pac-Man rights-owner Bandai-Namco because its origins weren’t with them, and its developer GCC licensed the rights to another party than them, which has given us such travesties as “Pac-Mom.” Which is a shame, because in general Ms. Pac-Man is a better game than Pac-Man. Its four mazes don’t have the nuance that Pac-Man’s does (there’s no one-way routes, for instance), it doesn’t have scatter periods to give the player a breather during each board, and after board #7 its fruit, and the score award for chasing it down, is random, taking an important measure of skill and just throwing it up in the air and shrugging.
But it does have multiple mazes. And its Red and Pink ghosts behave randomly for the first bit of each board (here’s a prior post about that), eliminating the major design flaw of Pac-Man: its vulnerability to patterns. Pac-Man is certainly not the only game to lack substantive randomness, but the nature of its maze-based play is that it’s relatively easy to perform them. So long as you hold in the direction you need to go at least five frames before you reach an intersection, you can be sure that you’re performing a pattern perfectly, making Pac-Man into an endurance game more than anything. Ms. Pac-Man doesn’t have that problem.
But that doesn’t mean that Ms. Pac-Man can’t be mastered, and the basis of that is through a technique called grouping. Grouping can be done in Pac-Man too, but if you know some good patterns it isn’t necessary. But in Ms. Pac-Man it’s a key skill, both to make sure you eat as many ghosts as possible in the early and mid boards, and for general survival, for a bunch of ghosts in one lump is much easier to avoid than a scattered mess of four separate ghosts.
The basic idea is to understand the ways to move in the maze so that pursuing ghosts take slightly different routes to reach you, so that leading ghosts are delayed just a bit, or trailing ghosts approach you slightly faster.
This time I’m going to leave the explanation to the video, but it’s interesting to think about, and to see if you can apply this information yourself.